I was sorting through a pile of junk mail and old receipts on my desk last Tuesday when my accountant, Mr. Henderson, called to confirm my tax appointment. Now, Mr. Henderson is a man of few words—usually just numbers, deadlines, and a stern reminder to keep better records. But that day, after we wrapped up the boring stuff, he got quiet for a second and then said, “You know, my wife makes these pumpkin cheesecake bars with a gingersnap crust every Thanksgiving. She got the recipe from a nurse she worked with thirty years ago. Best thing I’ve ever eaten.”
I almost dropped the phone. My accountant? Talking about dessert? Honestly, I was so surprised I asked him to repeat himself. He did, and then he mumbled something about the crust being the real star and hung up. I sat there staring at my stack of unopened bills, thinking about those pumpkin cheesecake bars. I mean, if a man who spends his life staring at spreadsheets gets this excited about a dessert, it has to be worth making, right? Maybe you’ve been there—where the last person you’d expect hands you a recipe goldmine.
I called his office back the next day, and his secretary kindly passed along the details. That weekend, I made my first batch of these easy pumpkin cheesecake bars with gingersnap crust, and let me tell you, Mr. Henderson was not exaggerating. The creamy, spiced pumpkin filling sits on top of a crunchy, buttery gingersnap base, and it all comes together without any fuss. No water bath, no complicated steps—just pure, comforting flavor. This recipe stayed with me because it proves that the best things often come from the most unexpected places.
Why You’ll Love This Recipe
These pumpkin cheesecake bars with gingersnap crust are the kind of dessert that makes you look like a hero without spending all day in the kitchen. I have tested this recipe at least a dozen times, tweaking the spice blend and the bake time until it was just right. Here is why I keep coming back to it:
- Quick & Easy: From start to finish, these bars are ready in about an hour, with only 15 minutes of active prep. Perfect for a busy weeknight when you still want something special.
- Simple Ingredients: You probably have most of these in your pantry already—canned pumpkin, cream cheese, sugar, eggs, and spices. No fancy grocery runs required.
- Perfect for Fall Gatherings: Whether it is a casual potluck, a Thanksgiving dinner, or just a cozy night in, these bars fit right in. They travel well and slice cleanly, which is always a win.
- Crowd-Pleaser: I have brought these to family dinners and office parties, and they disappear every single time. Kids love the sweetness, adults appreciate the sophisticated spice.
- Unbelievably Delicious: The contrast between the crunchy, molasses-rich gingersnap crust and the silky, tangy cheesecake filling is next-level. It is comfort food that feels a little fancy.
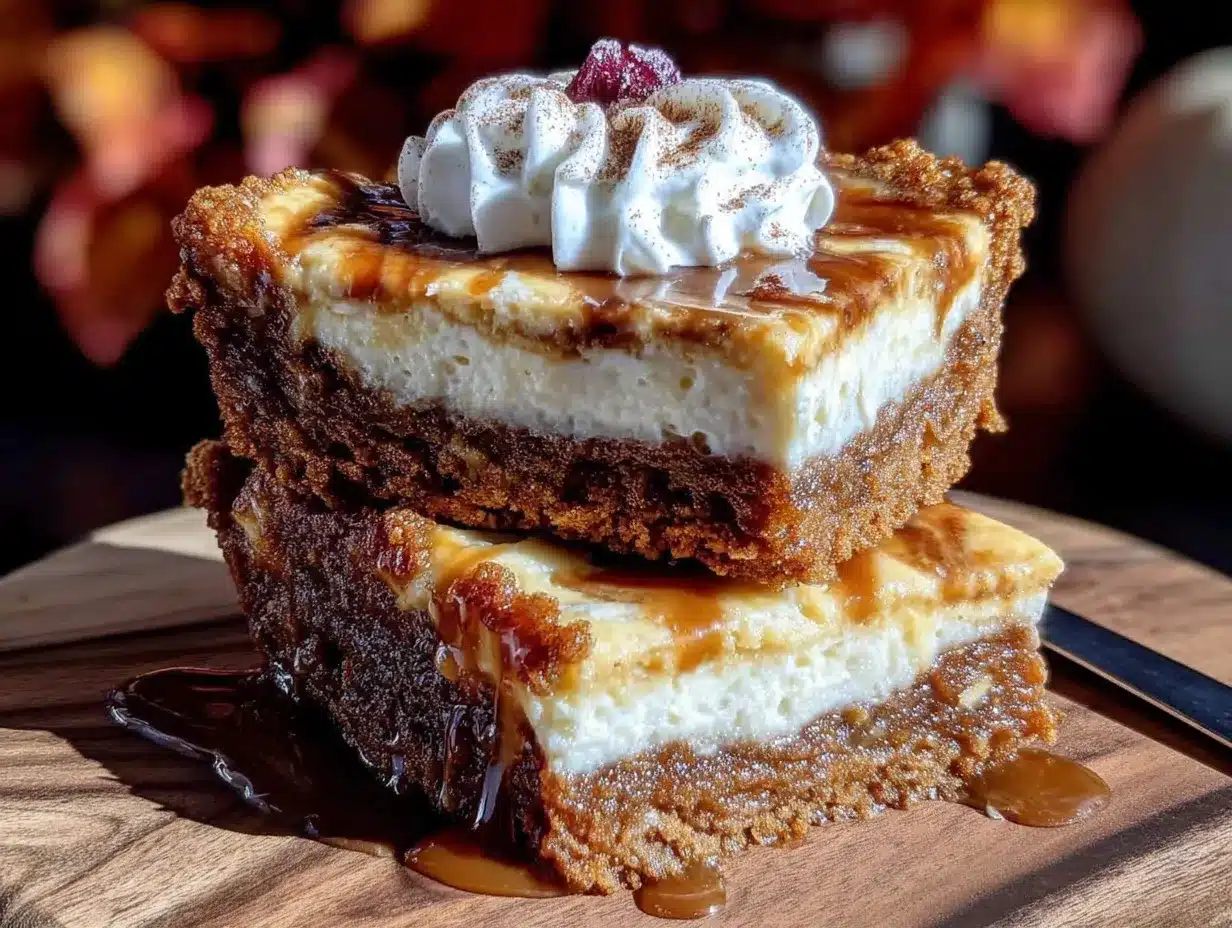
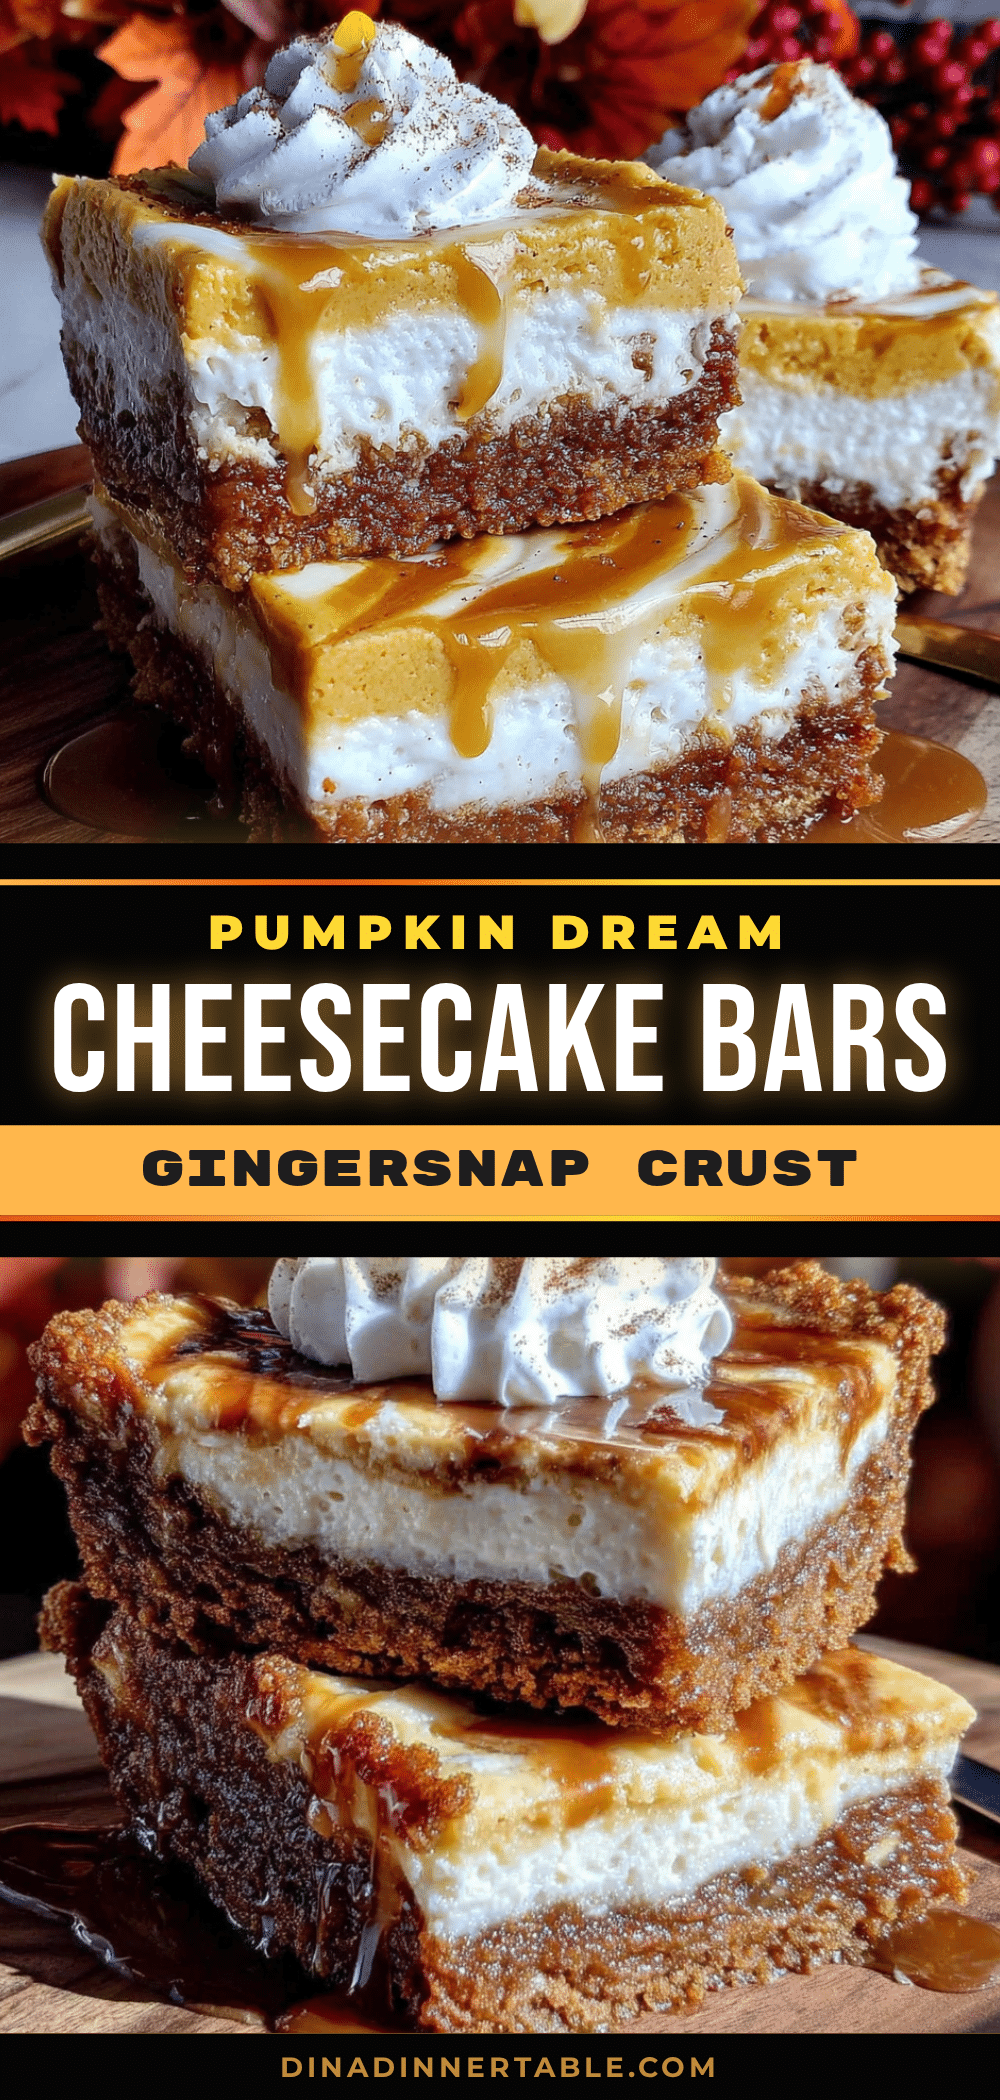
What makes these bars different from other pumpkin desserts is the crust. Most recipes use a standard graham cracker base, but swapping in gingersnaps adds a warm, spicy kick that pairs perfectly with the pumpkin. I tested this with store-bought and homemade gingersnaps, and honestly, the store-bought version works beautifully and saves time. This is not just another pumpkin cheesecake bar—it is the version that makes you close your eyes after the first bite.
What Ingredients You Will Need
This recipe uses simple, wholesome ingredients to deliver bold flavor and satisfying texture without the fuss. Most of these are pantry staples, especially if you keep basic baking supplies on hand. Here is what you need:
For the Gingersnap Crust
- 2 cups (about 200g) gingersnap cookie crumbs – I recommend using store-bought gingersnaps like Nabisco or Anna’s. Pulse them in a food processor until fine, or crush them in a sealed bag with a rolling pin.
- 5 tablespoons (70g) unsalted butter, melted – Use salted butter if that is what you have, just reduce the added salt in the recipe slightly.
- 2 tablespoons (25g) granulated sugar – This adds a touch of sweetness to balance the spicy cookies.
- Pinch of salt – Only if your butter is unsalted.
For the Pumpkin Cheesecake Filling
- 16 ounces (450g) cream cheese, softened – Full-fat cream cheese gives the best texture. Let it sit on the counter for 30 minutes before starting.
- 1 cup (200g) granulated sugar – Regular white sugar works perfectly here.
- 1 cup (240g) canned pumpkin puree – Make sure you grab pure pumpkin puree, not pumpkin pie filling. Libby’s is my go-to brand.
- 3 large eggs, room temperature – Cold eggs can make the filling lumpy. Place them in a bowl of warm water for 5 minutes if you are short on time.
- 1 teaspoon vanilla extract – Pure vanilla extract adds a deeper flavor than imitation.
- 1 teaspoon ground cinnamon – The backbone of the spice blend.
- 1/2 teaspoon ground ginger – This reinforces the gingersnap flavor in the crust.
- 1/4 teaspoon ground nutmeg – Freshly grated is best, but pre-ground works fine.
- 1/4 teaspoon ground cloves – A little goes a long way, so measure carefully.
- Pinch of salt – Enhances all the flavors.
For the Topping (Optional but Recommended)
- 1/2 cup (120ml) heavy cream – For whipped cream. Or use store-bought if you are in a hurry.
- 1 tablespoon powdered sugar – To sweeten the cream.
- Crushed gingersnaps and a sprinkle of cinnamon – For garnish.
Substitution Guidance: For a gluten-free version, use gluten-free gingersnap cookies. For a dairy-free option, substitute the cream cheese with a plant-based version and use coconut oil instead of butter in the crust. The texture will be slightly different, but still delicious.
Equipment Needed
You do not need a professional kitchen to make these pumpkin cheesecake bars with gingersnap crust. Here is what I use:
- 9×9-inch baking pan – This size gives you thick, satisfying bars. An 8×8-inch pan works too, but the bars will be a bit taller and may need an extra 5 minutes of baking.
- Food processor or rolling pin – For crushing the gingersnaps. I prefer the food processor because it is faster and gives a consistent crumb.
- Electric mixer (hand or stand) – A hand mixer works perfectly. I have made this with a whisk and some elbow grease, and it is doable, but the mixer saves time and ensures a smooth filling.
- Mixing bowls – One medium bowl for the crust, one large bowl for the filling.
- Spatula – A rubber spatula is great for scraping down the sides of the bowl.
- Parchment paper – Lining the pan makes lifting the bars out so much easier. I learned this the hard way after my first batch stuck to the pan.
- Measuring cups and spoons – Accurate measurements matter in baking.
Budget-Friendly Tip: If you do not own a food processor, place the gingersnaps in a sturdy zip-top bag and crush them with a rolling pin or even a heavy skillet. It takes a few extra minutes but works just as well.
Preparation Method
Follow these steps carefully, and you will have perfect pumpkin cheesecake bars with gingersnap crust every time. I have included sensory cues and troubleshooting tips along the way.
- Preheat your oven to 350°F (175°C). Line your 9×9-inch baking pan with parchment paper, leaving a 2-inch overhang on two opposite sides. This creates handles for lifting the bars out later.
- Make the crust: In a medium bowl, combine the gingersnap crumbs, melted butter, sugar, and salt. Stir with a fork until the mixture looks like wet sand and holds together when pressed. It should smell deeply of molasses and spice.
- Press the crust into the pan: Transfer the crumb mixture to your prepared pan. Use the bottom of a measuring cup or a flat glass to press it down firmly and evenly. I like to press firmly around the edges and then smooth out the center. Bake for 10 minutes, until the crust is fragrant and just starting to darken at the edges. Set aside to cool while you make the filling.
- Beat the cream cheese: In a large bowl, beat the softened cream cheese with an electric mixer on medium speed until smooth and creamy, about 2 minutes. Scrape down the sides of the bowl with a spatula. Do not overmix at this stage, or you will incorporate too much air.
- Add the sugar: Add the granulated sugar and beat on medium speed until combined, about 1 minute. The mixture should look fluffy and smooth.
- Mix in the pumpkin and eggs: Add the pumpkin puree, eggs one at a time, vanilla extract, and all the spices. Beat on low speed until just combined. The batter should be a vibrant orange color, smooth, and slightly thick. If you see small lumps of cream cheese, keep mixing on low for another 30 seconds.
- Pour over the crust: Pour the pumpkin cheesecake filling over the pre-baked crust. Use your spatula to spread it evenly to the edges. Tap the pan gently on the counter a few times to release any air bubbles.
- Bake: Place the pan in the preheated oven and bake for 35-40 minutes. The edges should look set and slightly puffed, but the center should still jiggle slightly when you gently shake the pan. This is the key to a creamy, not dry, cheesecake. If the center looks completely firm, you have overbaked it.
- Cool completely: Remove the pan from the oven and place it on a wire rack. Let the bars cool at room temperature for 1 hour. Then, transfer the pan to the refrigerator and chill for at least 4 hours, preferably overnight. This step is non-negotiable—the bars need time to set properly.
- Slice and serve: Once fully chilled, lift the bars out of the pan using the parchment overhang. Place them on a cutting board and use a sharp knife to slice into 16 squares. Wipe the knife clean between cuts for neat edges.
Cooking Tips & Techniques
I have made these pumpkin cheesecake bars with gingersnap crust more times than I can count, and I have definitely learned a few things the hard way. Here are my best tips:
- Room temperature ingredients matter: Cold cream cheese and eggs can create a lumpy batter. Leave them on the counter for 30 minutes before starting. If you forget, place the eggs in a bowl of warm water for 5 minutes and microwave the cream cheese in 10-second bursts until soft.
- Do not overmix the filling: Once you add the eggs, mix on low speed and stop as soon as everything is combined. Overmixing incorporates too much air, which can cause cracks on the surface of your bars.
- Check for doneness with a jiggle test: I used to rely on a toothpick, but that led to dry cheesecake. The center should have a slight wobble when you shake the pan. It will continue to set as it cools.
- Use a hot knife for clean slices: Run your knife under hot water, wipe it dry, then slice. Repeat between each cut. This gives you those picture-perfect bars.
- Patience is key: I know it is tempting to dig in after an hour of cooling, but the bars need at least 4 hours in the fridge to set properly. Overnight is even better. Trust me, the wait is worth it.
- One mistake I made: The first time I made these, I skipped lining the pan with parchment paper. Big mistake. The bars stuck to the bottom, and I ended up with a crumbly mess. Always use parchment.
Variations & Adaptations
One of the best things about this recipe is how easy it is to adapt. Here are some variations I have tried and loved:
- Gluten-Free Version: Use gluten-free gingersnap cookies for the crust. I have tested this with several brands, and they all work well. The texture is slightly more delicate, so press the crust firmly.
- Dairy-Free Version: Substitute the cream cheese with a plant-based alternative like Miyoko’s or Kite Hill. Use coconut oil instead of butter in the crust. The filling will be a bit softer, so chill it for a full 6 hours before slicing.
- Spice it Up: Add 1/4 teaspoon of cardamom or allspice to the filling for a more complex flavor profile. I tried this last Thanksgiving, and my sister-in-law asked for the recipe immediately.
- Chocolate Drizzle: Melt 1/2 cup of semi-sweet chocolate chips with 1 tablespoon of coconut oil and drizzle it over the chilled bars. The chocolate and pumpkin combo is surprisingly good.
- Pecan Topping: Before baking, sprinkle 1/2 cup of chopped pecans over the filling. They toast as the bars bake, adding a lovely crunch.
- Individual Mini Bars: Use a mini muffin tin lined with paper liners. Press a small amount of crust into each cup, add a spoonful of filling, and bake for 15-18 minutes. Perfect for parties.
I personally love the pecan topping variation. It adds a nutty, buttery element that pairs beautifully with the gingersnap crust. Just make sure the pecans are chopped finely so they do not sink into the filling.
Serving & Storage Suggestions
These pumpkin cheesecake bars with gingersnap crust are best served cold, straight from the refrigerator. The chilled texture is creamy and firm, making them easy to slice and serve. If you prefer a softer texture, let them sit at room temperature for 10 minutes before serving.
Presentation Tips: Place the bars on a platter and top each one with a dollop of whipped cream. Sprinkle a pinch of cinnamon and a few crushed gingersnaps over the top for a beautiful finish. For a fall-themed presentation, arrange them on a wooden board with fresh cranberries and rosemary sprigs.
Complementary Dishes: These bars pair wonderfully with a cup of hot coffee, spiced chai, or a glass of cold milk. If you are serving them as part of a dessert spread, they go well with apple crisp or a simple pumpkin bread.
Storage Instructions: Store the bars in an airtight container in the refrigerator for up to 5 days. Place a layer of parchment paper between stacked bars to prevent sticking. The flavors actually deepen after a day or two, so do not be surprised if they taste even better on day three.
Freezing Instructions: These bars freeze beautifully. Wrap individual slices tightly in plastic wrap, then place them in a freezer-safe bag or container. Freeze for up to 3 months. To thaw, transfer a slice to the refrigerator overnight. I often make a double batch and freeze half for busy weeks.
Reheating: I do not recommend reheating these bars, as the cheesecake filling loses its creamy texture. They are meant to be enjoyed cold or at room temperature.
Nutritional Information & Benefits
Here is the estimated nutritional breakdown for one bar (based on 16 servings):
| Nutrient | Amount per Serving |
|---|---|
| Calories | 285 |
| Total Fat | 18g |
| Saturated Fat | 10g |
| Cholesterol | 85mg |
| Sodium | 220mg |
| Total Carbohydrates | 28g |
| Dietary Fiber | 1g |
| Sugars | 20g |
| Protein | 5g |
| Vitamin A | 70% DV |
| Calcium | 6% DV |
| Iron | 6% DV |
Pumpkin is packed with vitamin A, which supports eye health and immune function. The cream cheese adds calcium and protein, while the ginger in the crust provides anti-inflammatory benefits. These bars are a treat, but they offer more nutritional value than your average dessert. If you are watching your sugar intake, you can reduce the sugar to 3/4 cup without affecting the texture too much.
Dietary Considerations: This recipe contains gluten, dairy, and eggs. For gluten-free or dairy-free options, see the variations section above.
Conclusion
These pumpkin cheesecake bars with gingersnap crust are the kind of recipe that becomes a tradition. They are easy enough for a Tuesday night but impressive enough for a holiday table. I love that they come together with minimal fuss and no special equipment, yet they taste like something from a fancy bakery. Every time I make them, I think of Mr. Henderson and his unexpected cooking advice. It is a reminder that good recipes can come from anywhere—even your accountant.
I encourage you to make these your own. Add a chocolate drizzle, swap in different spices, or top them with toasted pecans. The base recipe is forgiving and versatile. Once you try them, I bet you will find yourself making them for every fall gathering, just like I do.
Have you made these pumpkin cheesecake bars with gingersnap crust? I would love to hear how they turned out. Drop a comment below and let me know if you tried any variations. And if you share a photo on social media, tag me so I can see your beautiful creations. Happy baking!
Frequently Asked Questions
Can I use fresh pumpkin instead of canned?
Yes, you can use fresh pumpkin puree. Just make sure it is well-drained and not too watery. Roast a small sugar pumpkin, scoop out the flesh, and blend it until smooth. You may need to let it sit in a cheesecloth-lined strainer for 30 minutes to remove excess moisture.
Why did my cheesecake bars crack on top?
Cracks usually happen from overmixing the batter or overbaking. Mix the filling on low speed once you add the eggs, and remove the bars from the oven when the center still jiggles slightly. Rapid temperature changes can also cause cracks, so cool them slowly at room temperature before refrigerating.
Can I make these bars ahead of time?
Absolutely. These bars actually taste better after a day or two in the fridge because the flavors meld together. You can make them up to 3 days in advance and store them in an airtight container in the refrigerator. They also freeze well for up to 3 months.
What if I don’t have gingersnap cookies?
If you cannot find gingersnaps, you can use graham crackers or digestive biscuits as a substitute. Add 1/2 teaspoon of ground ginger and 1/4 teaspoon of cinnamon to the crust mixture to mimic the spicy flavor. It will not be exactly the same, but it will still be delicious.
Can I use a different size pan?
Yes, you can use a 9×13-inch pan for thinner bars. The bake time will be shorter, about 25-30 minutes. For an 8×8-inch pan, the bars will be thicker and may need an extra 5-10 minutes of baking. Keep an eye on the center jiggle to determine doneness.
Pin This Recipe!
Easy Pumpkin Cheesecake Bars with Gingersnap Crust
These easy pumpkin cheesecake bars feature a crunchy, buttery gingersnap crust and a creamy, spiced pumpkin filling. No water bath or complicated steps needed—just pure, comforting flavor perfect for fall gatherings.
- Prep Time: 15 minutes
- Cook Time: 35-40 minutes
- Total Time: 1 hour (plus 4 hours chilling)
- Yield: 16 servings 1x
- Category: Dessert
- Cuisine: American
Ingredients
- 2 cups (about 200g) gingersnap cookie crumbs
- 5 tablespoons (70g) unsalted butter, melted
- 2 tablespoons (25g) granulated sugar
- Pinch of salt (if butter is unsalted)
- 16 ounces (450g) cream cheese, softened
- 1 cup (200g) granulated sugar
- 1 cup (240g) canned pumpkin puree
- 3 large eggs, room temperature
- 1 teaspoon vanilla extract
- 1 teaspoon ground cinnamon
- 1/2 teaspoon ground ginger
- 1/4 teaspoon ground nutmeg
- 1/4 teaspoon ground cloves
- Pinch of salt
- 1/2 cup (120ml) heavy cream (optional, for topping)
- 1 tablespoon powdered sugar (optional, for topping)
- Crushed gingersnaps and cinnamon (optional, for garnish)
Instructions
- Preheat your oven to 350°F (175°C). Line a 9×9-inch baking pan with parchment paper, leaving a 2-inch overhang on two opposite sides.
- Make the crust: In a medium bowl, combine the gingersnap crumbs, melted butter, sugar, and salt. Stir with a fork until the mixture looks like wet sand and holds together when pressed.
- Press the crust into the pan: Transfer the crumb mixture to the prepared pan. Use the bottom of a measuring cup or a flat glass to press it down firmly and evenly. Bake for 10 minutes, until fragrant and just starting to darken at the edges. Set aside to cool.
- Beat the cream cheese: In a large bowl, beat the softened cream cheese with an electric mixer on medium speed until smooth and creamy, about 2 minutes. Scrape down the sides of the bowl.
- Add the sugar: Add the granulated sugar and beat on medium speed until combined, about 1 minute. The mixture should look fluffy and smooth.
- Mix in the pumpkin and eggs: Add the pumpkin puree, eggs one at a time, vanilla extract, and all the spices. Beat on low speed until just combined. The batter should be smooth and vibrant orange.
- Pour over the crust: Pour the pumpkin cheesecake filling over the pre-baked crust. Use a spatula to spread it evenly to the edges. Tap the pan gently on the counter to release air bubbles.
- Bake: Place the pan in the preheated oven and bake for 35-40 minutes. The edges should look set and slightly puffed, but the center should still jiggle slightly when you gently shake the pan.
- Cool completely: Remove the pan from the oven and place it on a wire rack. Let the bars cool at room temperature for 1 hour. Then, transfer to the refrigerator and chill for at least 4 hours, preferably overnight.
- Slice and serve: Once fully chilled, lift the bars out of the pan using the parchment overhang. Place on a cutting board and use a sharp knife to slice into 16 squares. Wipe the knife clean between cuts for neat edges.
Notes
For clean slices, run your knife under hot water and wipe dry between cuts. The bars need at least 4 hours in the fridge to set properly; overnight is even better. Always line the pan with parchment paper to prevent sticking.
Nutrition
- Serving Size: 1 bar
- Calories: 285
- Sugar: 20
- Sodium: 220
- Fat: 18
- Saturated Fat: 10
- Carbohydrates: 28
- Fiber: 1
- Protein: 5
Keywords: pumpkin cheesecake bars, gingersnap crust, fall dessert, easy cheesecake bars, pumpkin dessert


