There used to be a little diner called The Rusty Spoon off Route 9 in New Jersey that made what I still believe was the perfect turkey pot pie. When they closed in 2018—turned into a vape shop, of all things—I actually felt a little pang of grief. I mean, that pot pie got me through three long winters, two bad breakups, and one particularly rough Thanksgiving leftover season. After about seven tries—some were soupy disasters, one crust was so tough you could’ve used it as a frisbee—I finally got it. This is that recipe.
I remember the first time I walked into The Rusty Spoon. It was freezing cold, and the windows were all fogged up from the steam inside. The waitress didn’t even hand me a menu. She just said, “You want the pot pie, hon.” And she was right. The crust was this impossibly flaky thing that shattered when you touched it with a fork, and the filling was creamy but not heavy, packed with tender turkey and vegetables that still had a little bite to them. It was the kind of meal that made you forget it was freezing outside.
Honestly, recreating it became a bit of an obsession. I’d sit at my kitchen counter, scribbling notes, trying to remember every detail. Was there thyme in it? Definitely. Was the crust butter or shortening? I tested both. I even called the old diner’s phone number once—hoping maybe the owner had left a voicemail with a hint. No luck. But after that seventh attempt, I took a bite, closed my eyes, and there it was. That exact flavor I’d been chasing. Maybe you’ve been there too—chasing a taste from somewhere that no longer exists. This one’s for you.
Why You’ll Love This Recipe
Let me tell you why this leftover turkey pot pie is going to become your new post-Thanksgiving tradition. I’ve tested this recipe more times than I care to admit, and every single time, it delivers that same cozy, soul-warming feeling. It’s not just another way to use up leftovers—it’s the reason you’ll actually look forward to having extra turkey.
- Quick & Easy: From start to table in about 45 minutes. Perfect for those busy evenings when you want comfort food without the all-day commitment.
- Simple Ingredients: You probably have most of these in your pantry right now. No fancy grocery store runs needed—just good, honest ingredients.
- Perfect for Leftover Season: This is the ultimate way to transform leftover turkey into something completely new and exciting. It’s like getting a second Thanksgiving dinner, but better.
- Crowd-Pleaser: Even people who claim they’re “not big on pot pie” have asked me for seconds. It’s that good.
- Unbelievably Flaky Crust: The secret is in the technique—cold butter, minimal handling, and a little vodka for extra tenderness. Trust me on this one.
What makes this pot pie different from all the others? It’s the balance. The filling is rich but not gloppy, the vegetables are tender but not mushy, and that crust—oh, that crust. It’s the kind that makes you close your eyes after the first bite. I’ve had friends text me weeks after Thanksgiving just to say, “I made your pot pie again.” It’s comfort food at its finest, and it’s exactly what you need after a long day.
What Ingredients You Will Need
This recipe uses simple, wholesome ingredients that come together to create something truly special. Most of these are pantry staples, especially if you’ve just hosted a big holiday meal. Here’s what you’ll need:
For the Flaky Crust
- 2 ½ cups all-purpose flour (I prefer King Arthur for consistent results)
- 1 teaspoon salt
- 1 cup unsalted butter, very cold and cut into small cubes (freeze it for 15 minutes first)
- 6-8 tablespoons ice water
- 1 tablespoon vodka (optional, but it really does make the crust flakier)
For the Filling
- 3 cups cooked turkey, shredded or diced (white and dark meat both work great)
- 2 tablespoons unsalted butter
- 1 medium onion, diced
- 2 carrots, peeled and diced
- 2 celery stalks, diced
- 3 cloves garlic, minced
- ⅓ cup all-purpose flour
- 2 cups turkey or chicken broth (homemade is amazing, but store-bought works too)
- 1 cup whole milk (or half-and-half for extra richness)
- 1 cup frozen peas (no need to thaw)
- 1 teaspoon dried thyme
- ½ teaspoon dried rosemary
- Salt and black pepper to taste
- 1 egg, beaten with 1 tablespoon water (for egg wash)
I always recommend using good-quality butter for the crust—it makes a real difference in flavor. And if you have leftover turkey gravy, you can substitute ½ cup of it for some of the broth. It adds an extra layer of richness that’s just incredible.
Equipment Needed
You don’t need a ton of fancy equipment for this recipe, which is one of the reasons I love it. Here’s what you’ll need:
- 9-inch pie dish (glass or ceramic works best for even baking)
- Large skillet or saucepan for the filling
- Mixing bowls (one large, one medium)
- Pastry cutter or two forks for cutting butter into flour
- Rolling pin (a wine bottle works in a pinch—I’ve done it!)
- Measuring cups and spoons
- Sharp knife and cutting board
- Pastry brush for the egg wash
- Baking sheet to catch any drips
If you don’t have a pastry cutter, honestly, your hands work just fine. Just work quickly so the butter doesn’t warm up. And if you’re short on time, you can use a store-bought pie crust—I won’t tell anyone. But the homemade crust really is worth the extra few minutes.
Preparation Method
Alright, let’s make some pot pie magic. Take your time with this—it’s a labor of love, but I promise it’s worth every step.
- Start with the crust. In a large mixing bowl, whisk together the flour and salt. Add the cold butter cubes and use a pastry cutter or your fingertips to work the butter into the flour until it resembles coarse meal with some pea-sized butter pieces remaining. This is crucial—those little butter chunks are what create the flaky layers.
- Add the liquid. Drizzle the ice water and vodka (if using) over the flour mixture. Stir with a fork until the dough just starts to come together. It should look shaggy and a little dry—that’s perfect. If it’s too dry, add another tablespoon of ice water. Turn the dough onto a floured surface and gently bring it together into a disk. Wrap in plastic wrap and refrigerate for at least 30 minutes.
- While the dough chills, make the filling. In a large skillet over medium heat, melt the 2 tablespoons of butter. Add the onion, carrots, and celery. Cook for about 5-7 minutes, stirring occasionally, until the vegetables start to soften. The kitchen will start smelling amazing right about now.
- Add the garlic and seasonings. Stir in the minced garlic, thyme, and rosemary. Cook for another minute until fragrant. This is where the flavor really starts building.
- Make the roux. Sprinkle the ⅓ cup of flour over the vegetables and stir constantly for about 2 minutes. This cooks out the raw flour taste and helps thicken the filling. It’ll look a little pasty—that’s exactly what you want.
- Add the liquids. Slowly pour in the broth while whisking continuously to prevent lumps. Then add the milk. Keep stirring until the mixture comes to a gentle simmer and thickens, about 3-4 minutes. It should coat the back of a spoon.
- Add the turkey and peas. Stir in the shredded turkey and frozen peas. Season with salt and pepper to taste. Remove from heat and let it cool slightly while you roll out the crust. The filling will continue to thicken as it cools.
- Preheat your oven to 400°F (200°C). Place a baking sheet on the bottom rack to catch any drips—trust me, you don’t want to clean burnt filling off your oven floor.
- Roll out the dough. On a lightly floured surface, roll the chilled dough into a circle about 12 inches in diameter, roughly ⅛-inch thick. Don’t worry if it’s not perfectly round—rustic is charming.
- Assemble the pot pie. Pour the turkey filling into your pie dish. Gently place the rolled-out dough on top. Trim the edges, leaving about a ½-inch overhang, then crimp or fold the edges as desired. Cut 4-5 slits in the top crust to let steam escape. Brush the entire crust with the egg wash for that beautiful golden color.
- Bake. Place the pot pie on the middle rack and bake for 25-30 minutes, until the crust is golden brown and the filling is bubbly. If the edges start browning too quickly, cover them loosely with foil.
- Rest before serving. Let the pot pie sit for at least 10 minutes before cutting into it. This allows the filling to set so it doesn’t run all over your plate. I know it’s hard to wait, but it’s worth it.
Cooking Tips & Techniques
I’ve made this pot pie more times than I can count, and I’ve learned a few things along the way. Here are my best tips to help you nail it on your first try.
Keep everything cold. The secret to a flaky crust is cold butter. If your butter starts to soften while you’re working with it, pop the dough back in the fridge for 10 minutes. I once tried to rush this step and ended up with a tough, dense crust. Never again.
Don’t skip the vodka. I know it sounds weird, but alcohol inhibits gluten formation, which means a more tender crust. It evaporates during baking, so there’s no boozy taste—just perfect flakiness. If you don’t have vodka, you can use extra ice water, but the texture won’t be quite as nice.
Pre-cook your filling. This is non-negotiable. If you put raw vegetables into the pie, they’ll release water as they bake and you’ll end up with a soggy, watery mess. Cooking them first concentrates the flavor and ensures everything is perfectly tender.
Let the filling cool. I learned this one the hard way. Pouring hot filling into a pie dish and topping it with dough will partially cook the dough before it even hits the oven. Let the filling cool for 10-15 minutes before assembling. Your crust will thank you.
Use a baking sheet. Pot pies have a tendency to bubble over, especially if you fill them generously. Place your pie dish on a baking sheet to catch any drips. It saves you from a messy oven and a lot of scrubbing.
Check for doneness. The crust should be deep golden brown, and you should see the filling bubbling through the slits. If you’re not sure, insert a knife into one of the slits—it should come out hot to the touch.
Variations & Adaptations
One of the best things about this recipe is how flexible it is. Here are some of my favorite variations:
Vegetarian Version: Swap the turkey for 3 cups of diced mushrooms, extra vegetables like parsnips and sweet potatoes, and use vegetable broth instead of turkey broth. I’ve made this for my vegetarian friends and they absolutely loved it.
Chicken Pot Pie: Obviously, this works beautifully with leftover roast chicken too. I actually make this version year-round, not just after Thanksgiving. It’s equally delicious.
Gluten-Free Adaptation: Use a gluten-free all-purpose flour blend for both the crust and the roux. I’ve tested this with Bob’s Red Mill 1-to-1 Baking Flour and it works great. Just be gentle with the crust—gluten-free dough is more delicate.
Dairy-Free Option: Substitute the butter with vegan butter or coconut oil, and use unsweetened almond milk or oat milk instead of whole milk. The flavor will be slightly different, but still delicious.
Individual Pot Pies: Use ramekins or small oven-safe bowls for single-serving pot pies. Reduce the baking time to about 18-20 minutes. These are perfect for meal prep—just assemble and bake when you’re ready.
Herb Variations: Feel free to experiment with different herbs. Fresh sage is amazing in this, especially if you’re using leftover Thanksgiving turkey. Tarragon adds a lovely anise-like flavor that pairs beautifully with poultry.
Serving & Storage Suggestions
This pot pie is at its absolute best served warm, straight from the oven. Let it rest for 10 minutes after baking, then scoop out generous portions. The filling should be thick and creamy, with tender chunks of turkey and vegetables in every bite.
What to serve with it: A simple green salad with a tangy vinaigrette is the perfect counterpoint to the rich, creamy filling. I also love serving it with cranberry sauce on the side—especially if you have leftover cranberry sauce from your holiday meal. The tartness cuts through the richness beautifully.
Storage: Leftover pot pie keeps well in the refrigerator for up to 4 days. Cover it tightly with foil or plastic wrap. The crust will soften slightly, but it’s still delicious. To reheat, place it in a 350°F oven for about 15-20 minutes, or until heated through. You can also microwave individual portions, but the crust won’t be as crispy.
Freezing: This pot pie freezes beautifully. Assemble the pie completely but don’t bake it. Wrap it tightly in plastic wrap and then foil, and freeze for up to 3 months. When you’re ready to bake, you can bake it from frozen—just add about 15-20 minutes to the baking time. Alternatively, you can bake it first, then freeze the baked pie. Reheat directly from frozen in a 350°F oven.
Make ahead: You can prepare the filling up to 2 days in advance and keep it in the refrigerator. Make the dough and refrigerate it as well. When you’re ready to bake, simply assemble and bake as directed. This is a huge time-saver on busy days.
Nutritional Information & Benefits
Here’s the thing about this pot pie—it’s comfort food, so it’s not exactly diet food. But it does have some redeeming qualities. The turkey is an excellent source of lean protein, and the vegetables add fiber and essential vitamins. The carrots provide vitamin A, while the peas offer vitamin C and fiber.
Per serving (based on 6 servings):
- Calories: 485
- Protein: 28g
- Carbohydrates: 38g
- Fat: 24g
- Fiber: 4g
- Sugar: 6g
This recipe contains dairy and gluten. For a gluten-free version, use the adaptations mentioned above. For a lower-calorie option, you can use a top crust only (skip the bottom crust) to reduce the overall calorie and fat content. I’ve done this before, and while it’s not quite as decadent, it’s still incredibly satisfying.
Conclusion
This cozy leftover turkey pot pie is more than just a recipe—it’s a way to extend the warmth and comfort of Thanksgiving a little longer. Every time I make it, I think about that little diner and how something as simple as a pot pie can hold so many memories. It’s the kind of meal that makes a cold evening feel warmer, a rough day feel better, and a kitchen feel like home.
I hope you give this recipe a try, whether you’re working through a mountain of Thanksgiving leftovers or just craving something hearty and delicious. Feel free to make it your own—swap in your favorite vegetables, experiment with different herbs, or try the individual pot pie version. Cooking is all about making things taste like you.
I’d love to hear how yours turns out! Leave a comment below and let me know if you tried any variations, or tag me in your photos on social media. Happy cooking, friends—and here’s to many cozy meals ahead.
Frequently Asked Questions
Can I use store-bought pie crust instead of homemade?
Absolutely! If you’re short on time, a good quality store-bought crust works perfectly. Just look for one that’s made with butter for the best flavor. Pillsbury and Trader Joe’s both have excellent options.
How do I prevent a soggy bottom crust?
The key is to pre-cook your filling and let it cool slightly before assembling. Also, make sure your oven is fully preheated before baking. Baking on the bottom rack for the first 10 minutes can also help crisp up the bottom crust.
Can I make this pot pie in a cast iron skillet?
Yes, and it’s actually my preferred method! If you’re using an oven-safe skillet, you can make the filling right in the skillet, then top it with the crust and bake. It saves on dishes and looks beautiful served straight from the skillet.
How do I thicken the filling if it’s too runny?
If your filling seems thin after simmering, mix 1 tablespoon of cornstarch with 2 tablespoons of cold water to make a slurry. Stir it into the simmering filling and cook for another minute—it will thicken up nicely.
Can I add other vegetables to the filling?
Of course! This recipe is very adaptable. Try adding diced potatoes, parsnips, mushrooms, or even green beans. Just make sure to cook them until tender before adding the broth and milk. Frozen mixed vegetables work great in a pinch too.
Pin This Recipe!

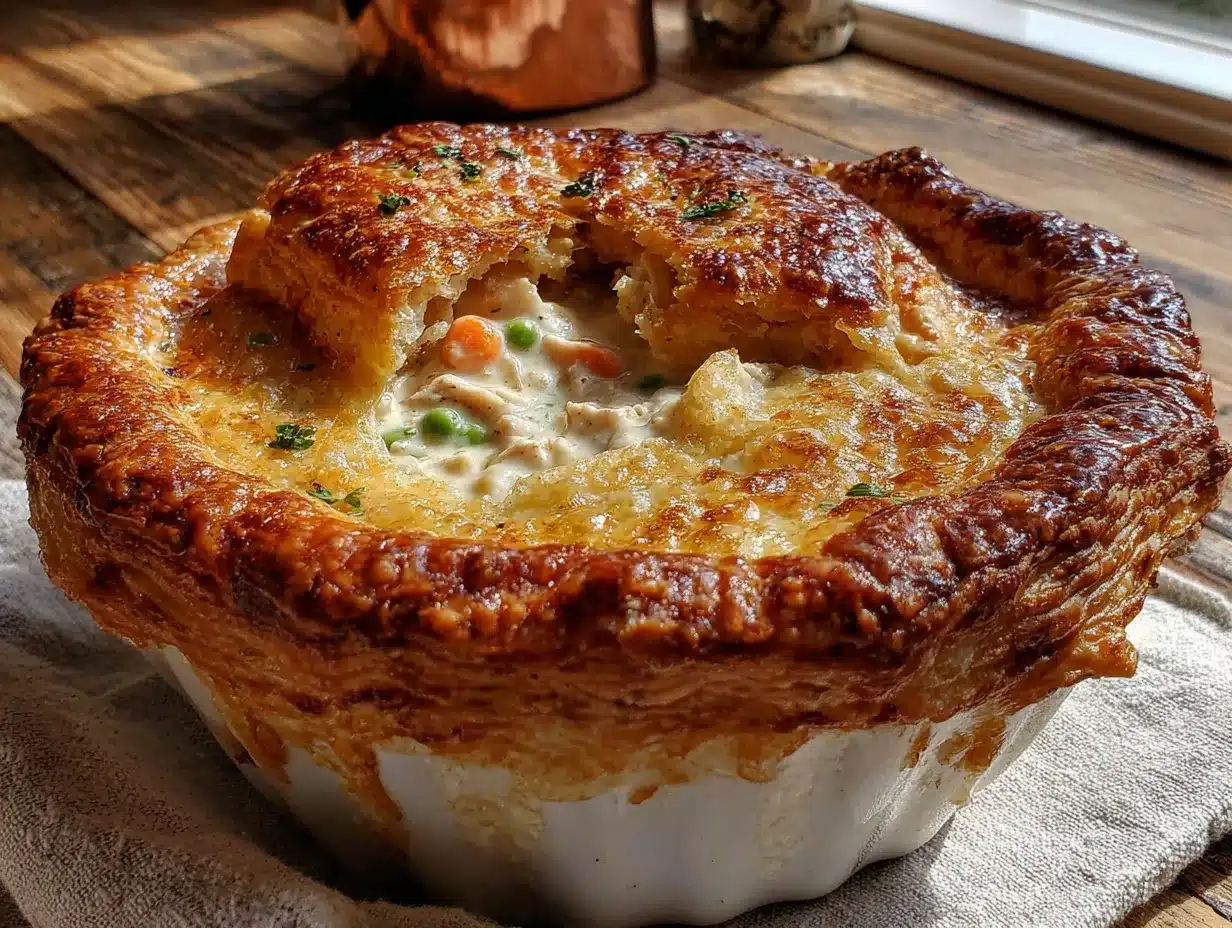
Cozy Leftover Turkey Pot Pie with Flaky Crust

This leftover turkey pot pie features a flaky, buttery crust and a creamy filling packed with tender turkey and vegetables. It’s the ultimate comfort food for post-Thanksgiving season, ready in about 45 minutes.
- Prep Time: 15 minutes
- Cook Time: 30 minutes
- Total Time: 45 minutes
- Yield: 6 servings 1x
- Category: Main Course
- Cuisine: American
Ingredients
- 2 ½ cups all-purpose flour
- 1 teaspoon salt
- 1 cup unsalted butter, very cold and cut into small cubes
- 6–8 tablespoons ice water
- 1 tablespoon vodka (optional)
- 3 cups cooked turkey, shredded or diced
- 2 tablespoons unsalted butter
- 1 medium onion, diced
- 2 carrots, peeled and diced
- 2 celery stalks, diced
- 3 cloves garlic, minced
- ⅓ cup all-purpose flour
- 2 cups turkey or chicken broth
- 1 cup whole milk (or half-and-half)
- 1 cup frozen peas (no need to thaw)
- 1 teaspoon dried thyme
- ½ teaspoon dried rosemary
- Salt and black pepper to taste
- 1 egg, beaten with 1 tablespoon water (for egg wash)
Instructions
- Start with the crust. In a large mixing bowl, whisk together the flour and salt. Add the cold butter cubes and use a pastry cutter or your fingertips to work the butter into the flour until it resembles coarse meal with some pea-sized butter pieces remaining.
- Add the liquid. Drizzle the ice water and vodka (if using) over the flour mixture. Stir with a fork until the dough just starts to come together. Turn the dough onto a floured surface and gently bring it together into a disk. Wrap in plastic wrap and refrigerate for at least 30 minutes.
- While the dough chills, make the filling. In a large skillet over medium heat, melt the 2 tablespoons of butter. Add the onion, carrots, and celery. Cook for about 5-7 minutes, stirring occasionally, until the vegetables start to soften.
- Add the garlic and seasonings. Stir in the minced garlic, thyme, and rosemary. Cook for another minute until fragrant.
- Make the roux. Sprinkle the ⅓ cup of flour over the vegetables and stir constantly for about 2 minutes.
- Add the liquids. Slowly pour in the broth while whisking continuously to prevent lumps. Then add the milk. Keep stirring until the mixture comes to a gentle simmer and thickens, about 3-4 minutes.
- Add the turkey and peas. Stir in the shredded turkey and frozen peas. Season with salt and pepper to taste. Remove from heat and let it cool slightly.
- Preheat your oven to 400°F (200°C). Place a baking sheet on the bottom rack to catch any drips.
- Roll out the dough. On a lightly floured surface, roll the chilled dough into a circle about 12 inches in diameter, roughly ⅛-inch thick.
- Assemble the pot pie. Pour the turkey filling into your pie dish. Gently place the rolled-out dough on top. Trim the edges, leaving about a ½-inch overhang, then crimp or fold the edges as desired. Cut 4-5 slits in the top crust. Brush the entire crust with the egg wash.
- Bake. Place the pot pie on the middle rack and bake for 25-30 minutes, until the crust is golden brown and the filling is bubbly. If the edges start browning too quickly, cover them loosely with foil.
- Rest before serving. Let the pot pie sit for at least 10 minutes before cutting into it.
Notes
Keep everything cold for a flaky crust. Don’t skip the vodka—it inhibits gluten formation for a more tender crust. Pre-cook the filling and let it cool before assembling to avoid a soggy crust. Use a baking sheet to catch drips. Let the pot pie rest for 10 minutes before serving to allow the filling to set.
Nutrition
- Serving Size: 1 serving
- Calories: 485
- Sugar: 6
- Fat: 24
- Carbohydrates: 38
- Fiber: 4
- Protein: 28
Keywords: turkey pot pie, leftover turkey, pot pie, comfort food, Thanksgiving leftovers, flaky crust


