My sister-in-law, Jen, wasn’t trying to impress anyone. I’d stopped by her place on a random Tuesday afternoon to drop off a casserole dish she’d lent me, and this smell—this warm, savory, slightly nutty smell—hit me before I even got through the front door. She was standing at her kitchen counter, completely unfazed, shaping a massive ball of cheese mixture with her bare hands while her toddler napped on the couch. “Oh, that?” she said when I asked what she was making. “It’s just the cheese ball I throw together for Thanksgiving. No big deal.”
No big deal? Let me tell you, I nearly lost my mind. On her counter sat what I can only describe as the most adorable thing I had ever seen in a kitchen—a turkey-shaped cheese ball, complete with pretzel feathers fanning out behind it like it was ready to strut right off the platter. It was ridiculous and wonderful and somehow completely effortless-looking all at once. She let me taste a bit of the cheese mixture, and honestly, I think I stood there for a solid five minutes just staring at it, trying to figure out how she made something so fun look so easy. Maybe you’ve been there—that moment when you see a dish and think, “I need that in my life immediately.”
I asked her for the recipe on the spot, and she scribbled it down on the back of a grocery receipt. I’ve been making it ever since, and it has become my secret weapon for every fall gathering. It’s the kind of appetizer that makes people stop mid-conversation. They see this little turkey sitting on the snack table, and they can’t help but smile. Then they taste it, and they can’t stop eating it. It’s creamy, it’s savory, it’s packed with flavor, and it looks like a centerpiece. The best part? It takes maybe twenty minutes of actual work. I keep making it because it never fails to steal the show, and I still think about that Tuesday afternoon whenever I roll that cheese mixture into a ball.
Why You’ll Love This Recipe
This isn’t just another cheese ball recipe. This is the appetizer that will make you the hero of your next gathering. I’ve tested this at family dinners, potlucks, and holiday parties, and I can tell you with complete confidence—people go nuts for it. Here is why this recipe deserves a permanent spot in your hosting rotation:
- Quick & Easy: You can put this together in about 20 minutes of active time. The hardest part is waiting for the cheese to soften, and honestly, that’s not even hard.
- Simple Ingredients: Cream cheese, cheddar, a few seasonings, and some pretzels. You probably have most of this in your kitchen right now.
- Perfect for Gatherings: This turkey-shaped cheese ball is designed for parties. It sits right in the middle of the snack table and draws people in like a magnet.
- Crowd-Pleaser: I have watched picky eaters, cheese snobs, and kids all reach for seconds. It is universally loved.
- Unbelievably Delicious: The combination of creamy cheese, sharp cheddar, and crunchy pretzels is next-level comfort food. It tastes as good as it looks.
- Make-Ahead Friendly: You can assemble this a day or two in advance. Just add the pretzel feathers right before serving so they stay crunchy.
- Totally Customizable: Want to make it spicy? Add some jalapeños. Need it gluten-free? Swap the pretzels for gluten-free crackers. This recipe bends to your needs.
This is the kind of recipe that makes you look like you spent hours in the kitchen when you really didn’t. It’s comfort food reimagined as a showstopper—fun, festive, and full of flavor. Perfect for impressing guests without stress, or turning a simple snack into something memorable.
What Ingredients You Will Need
This recipe uses simple, everyday ingredients to create something that feels special. Most of these are pantry staples or easy to find at any grocery store. Here is what you will need and why each ingredient matters:
- Cream Cheese (16 ounces, softened): This is the base of your cheese ball. Make sure it is at room temperature so it blends smoothly. I recommend Philadelphia cream cheese for the creamiest texture, but any full-fat block cream cheese works well.
- Sharp Cheddar Cheese (2 cups, shredded): This gives the cheese ball its bold, savory flavor. I prefer sharp or extra-sharp cheddar for the most punch. Pre-shredded cheese works in a pinch, but freshly shredded melts and blends much better. (Pro tip: shred your own—it really does make a difference in texture.)
- Green Onions (3 to 4, thinly sliced): These add a mild oniony bite and a pop of green color. They also help balance the richness of the cream cheese.
- Worcestershire Sauce (1 teaspoon): This adds a deep, savory umami flavor that you can’t quite identify but would miss if it weren’t there. It is the secret ingredient that makes people ask, “What is in this?”
- Garlic Powder (1/2 teaspoon): For a gentle garlicky background note. Don’t use garlic salt here unless you adjust the added salt.
- Onion Powder (1/2 teaspoon): Adds depth and rounds out the savory flavors. It works alongside the fresh green onions for layers of onion flavor.
- Salt (1/4 teaspoon): Just enough to bring everything together. Adjust to taste depending on how salty your cheese is.
- Black Pepper (1/4 teaspoon, freshly ground): A little warmth and bite to finish the seasoning.
- Pretzel Sticks (about 20 to 24): These become the turkey feathers. They need to be sturdy enough to stick into the cheese ball without breaking. Snyder’s or Utz brand pretzel sticks are my go-to. (For a gluten-free version, look for gluten-free pretzel sticks or use carrot sticks instead.)
- Candy Eyes (2): For the turkey’s eyes. You can find these at any baking supply store or online. If you don’t have candy eyes, use two small black olives or capers.
- Red Bell Pepper (1 small piece): Cut into a small triangle shape for the turkey’s beak. A tiny sliver of carrot works too.
- Crackers or Sliced Baguette (for serving): Anything sturdy enough to scoop up the cheese. I like buttery crackers or toasted baguette rounds.
That is it. No exotic ingredients, no complicated shopping list. Everything comes together to create something that looks like you fussed for hours. The key is using good-quality cream cheese and shredding your own cheddar—trust me on this one.
Equipment Needed
You don’t need any fancy gadgets for this recipe. Here is what you will need:
- Large Mixing Bowl: Big enough to hold all the cheese and mix it thoroughly. A glass or stainless steel bowl works great.
- Hand Mixer or Stand Mixer: A hand mixer makes blending the cream cheese effortless. If you don’t have one, you can use a sturdy spatula and some elbow grease—it just takes a little longer.
- Rubber Spatula: For scraping down the sides of the bowl and shaping the cheese ball. A silicone spatula is ideal because it doesn’t stick.
- Plastic Wrap: Essential for wrapping the cheese ball while it chills. It keeps the cheese from drying out and absorbing fridge odors.
- Serving Platter or Board: A large, flat surface where your turkey can spread its wings—er, pretzel feathers. A wooden cutting board or a white platter makes the colors pop.
- Paring Knife: For cutting the bell pepper beak and any other small garnishes.
- Cutting Board: A small one for trimming the pepper or carrot.
If you don’t have a hand mixer, you can soften the cream cheese thoroughly and mix by hand. It will be a bit more work, but the result is the same. I have made this recipe both ways, and honestly, the hand-mixed version has a slightly more rustic texture that I kind of love.
Preparation Method
- Soften the Cream Cheese: Take your cream cheese out of the refrigerator about 30 to 45 minutes before you start. It should be soft enough that you can press your finger into it easily. If you forgot to take it out, you can microwave it in 10-second bursts, but be careful—you want it soft, not melted. (I may have learned this the hard way.)
- Mix the Base: In your large mixing bowl, add the softened cream cheese, shredded sharp cheddar, sliced green onions, Worcestershire sauce, garlic powder, onion powder, salt, and pepper. Beat with your hand mixer on medium speed until everything is well combined and smooth. Stop and scrape down the sides of the bowl with your spatula halfway through. The mixture should be thick, creamy, and evenly colored. Taste it—yes, taste it. Adjust the salt or pepper if you think it needs it.
- Chill the Mixture: Scoop the cheese mixture onto a large piece of plastic wrap. Shape it into a rough ball, then wrap it tightly. Refrigerate for at least 2 hours, or up to overnight. This step is important—the cheese needs to firm up so you can shape it into a turkey body without it falling apart. If you are short on time, pop it in the freezer for 30 minutes, but don’t forget about it. (Ask me how I know.)
- Shape the Turkey Body: Once the cheese mixture is firm, unwrap it and place it on your serving platter. Using your hands, shape it into a rounded oval or dome shape—this will be the turkey’s body. It doesn’t have to be perfect. A slightly irregular shape looks more natural, honestly. If the cheese starts to get too soft to shape, pop it back in the fridge for 10 minutes.
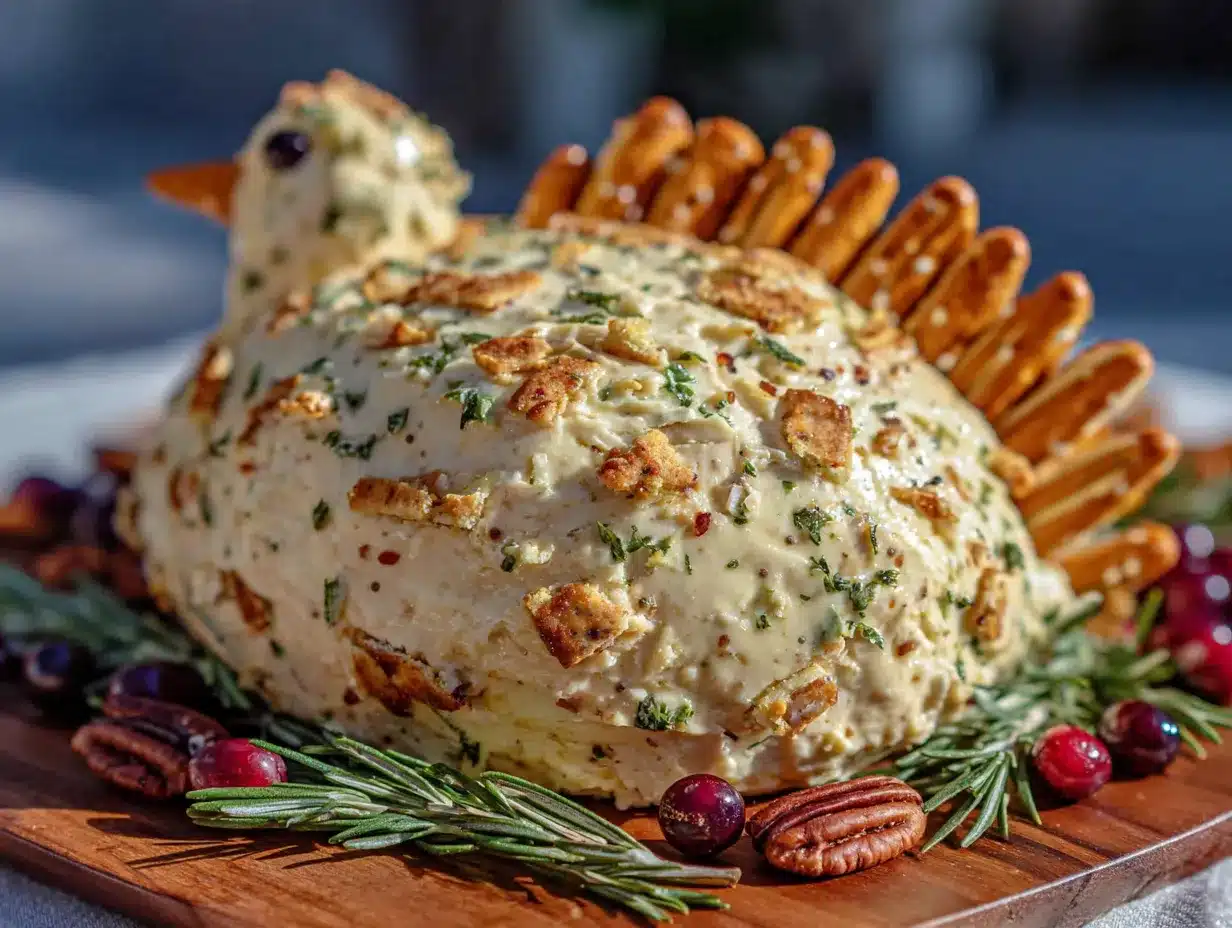
- Insert the Pretzel Feathers: This is the fun part. Starting at the back of the cheese ball, gently push the pretzel sticks into the cheese at an angle, fanning them out like turkey tail feathers. Work in rows—start with the longest row at the very back, then add shorter rows as you move forward toward the front of the turkey. Leave the front section of the cheese ball empty for the turkey’s face. Use about 15 to 18 pretzels for the feathers, depending on how full you want them.
- Add the Face: Press two candy eyes into the front of the cheese ball. Cut a small triangle from the red bell pepper and press it in below the eyes for the beak. You can also add a small piece of red pepper under the beak for a wattle if you want to get fancy. Step back and admire your work—this is the moment it all comes together.
- Serve Immediately or Refrigerate: If you are serving right away, surround the turkey with crackers and let people dig in. If you are making it ahead, cover the cheese ball loosely with plastic wrap (without disturbing the pretzels) and refrigerate. Add the pretzels just before serving if you want them extra crunchy.
Your turkey-shaped cheese ball is ready to steal the show. The whole process takes about 20 minutes of active work plus chilling time. It is so simple that you will wonder why you haven’t been making cheese ball turkeys your whole life.
Cooking Tips & Techniques
I have made this recipe more times than I can count, and I have definitely learned a few things along the way. Here are my best tips for success:
Get the cream cheese really soft. This is the most common mistake I see. If your cream cheese is even slightly cold, you will end up with lumps, and nobody wants a lumpy cheese ball. Leave it on the counter for a full hour if you can. Your mixer will thank you.
Shred your own cheddar. I know, I know—pre-shredded cheese is convenient. But it is coated with anti-caking agents that prevent it from melting smoothly. Freshly shredded cheddar blends into the cream cheese like a dream. The texture is noticeably creamier. I promise it is worth the extra two minutes.
Don’t skip the chilling step. I made this mistake once when I was in a hurry. I tried to shape the cheese ball right after mixing, and it was a sticky, messy disaster. The cheese mixture needs time to firm up so it holds its shape. Two hours in the fridge is non-negotiable if you want a clean, professional-looking turkey.
Insert pretzels at the right angle. You want the pretzels to fan out like real feathers, so angle them outward as you push them in. If you push them straight in, they will look like a porcupine, not a turkey. A 45-degree angle is about right. Start from the back and work your way forward.
Make it ahead of time. This is a lifesaver for hosting. You can prepare the cheese mixture, shape the body, and refrigerate it covered for up to two days. Just add the pretzels and face decorations an hour before serving. Your future self will be so grateful.
If a pretzel breaks, don’t panic. It happens. Just eat the broken piece (chef’s snack) and grab another pretzel. The cheese ball will cover up any minor imperfections. Nobody is inspecting your turkey with a magnifying glass.
Variations & Adaptations
One of the best things about this recipe is how easily it adapts. Here are some variations I have tried and loved:
Spicy Southwest Turkey: Add 1/4 cup of finely diced pickled jalapeños and 1/2 teaspoon of cumin to the cheese mixture. Use pepper jack cheese instead of cheddar. The result is a cheese ball with a kick that pairs beautifully with tortilla chips.
Bacon Ranch Turkey: Stir in 1/2 cup of cooked, crumbled bacon and 1 tablespoon of ranch seasoning mix. This version is absolutely irresistible. I made it for a Super Bowl party, and it was gone in twenty minutes.
Herb & Goat Cheese Turkey: Replace half the cream cheese with soft goat cheese. Add 2 tablespoons of fresh chopped chives and 1 tablespoon of fresh dill. This version is tangier and more sophisticated—perfect for an adult gathering.
Gluten-Free Adaptation: Use gluten-free pretzel sticks or swap the pretzels entirely for carrot sticks, celery sticks, or bell pepper strips. The visual effect is slightly different, but it still looks like a turkey and tastes amazing.
Nutty Turkey: Roll the outside of the cheese ball in finely chopped pecans or walnuts before adding the pretzels. The nutty coating adds crunch and a toasty flavor that complements the cheese beautifully. This is my personal favorite variation for Thanksgiving.
Dairy-Free Option: Use dairy-free cream cheese and shredded vegan cheddar. The texture will be slightly different, but the flavor can still be great. Add a little extra nutritional yeast for a cheesy taste.
Feel free to experiment. This recipe is forgiving and welcomes creativity. The basic formula—cream cheese plus cheddar plus seasonings—works as a canvas for almost any flavor profile you can imagine.
Serving & Storage Suggestions
This turkey-shaped cheese ball is designed to be the star of your appetizer table. Here is how to serve and store it for the best experience:
Serving Temperature: Let the cheese ball sit at room temperature for about 15 to 20 minutes before serving. Cold cheese doesn’t spread as well, and the flavors are muted when it is straight out of the fridge. A little time at room temperature makes it creamy and fully flavorful.
What to Serve With It: Arrange an assortment of sturdy crackers, sliced baguette rounds, pretzel chips, and vegetable crudités around the turkey. I like to use a large wooden board and create a little landscape—the turkey in the center, crackers fanning out like a peacock’s tail. It makes for a gorgeous presentation. For a full spread, serve alongside a classic charcuterie board or a bowl of roasted butternut squash soup for dipping.
Beverage Pairings: This cheese ball pairs beautifully with a crisp white wine like Sauvignon Blanc or a light beer like a pilsner. For non-alcoholic options, sparkling cider or apple juice works wonderfully with the savory cheese.
Storage: Leftover cheese ball (if there is any) can be wrapped tightly in plastic wrap and stored in the refrigerator for up to 5 days. Remove the pretzels before storing—they will get soft in the fridge. You can add fresh pretzels when you serve the leftovers.
Reheating: This is a cold appetizer, so no reheating is needed. Just let it sit at room temperature for a few minutes before serving again.
Flavor Development: Honestly, the cheese ball tastes even better the next day. The flavors meld together overnight, creating a more complex, harmonious taste. If you can resist eating it all at once, save some for tomorrow.
Nutritional Information & Benefits
While this is definitely a treat-yourself appetizer, it does offer some nutritional benefits worth noting. Here is an approximate breakdown per serving (based on 12 servings, cheese ball only, not including crackers):
| Nutrient | Amount Per Serving |
|---|---|
| Calories | 210 |
| Total Fat | 18g |
| Saturated Fat | 11g |
| Cholesterol | 55mg |
| Sodium | 320mg |
| Total Carbohydrates | 4g |
| Dietary Fiber | 0g |
| Sugars | 2g |
| Protein | 8g |
Health Benefits: Cheese is a good source of calcium and protein, which support bone health and muscle function. Cream cheese provides vitamin A, which is important for eye health and immune function. The green onions add a small amount of vitamin K and antioxidants. If you serve the cheese ball with vegetable crudités, you add fiber and vitamins to the snack.
Dietary Considerations: This recipe is vegetarian and can be made gluten-free and low-carb with simple substitutions. It is not suitable for vegans or those with dairy allergies without significant modifications. The sodium content is moderate, so those watching their salt intake should enjoy in moderation.
My Perspective: I believe in balance. This cheese ball is a celebratory dish—it is meant for gatherings and special occasions. It is okay to indulge. Pair it with fresh vegetables and whole-grain crackers, and you have a treat that feels both festive and reasonably wholesome.
Conclusion
This crowd-pleasing turkey-shaped cheese ball with pretzel feathers is more than just an appetizer—it is a conversation starter, a centerpiece, and a memory-maker all rolled into one. It captures the spirit of fall gatherings and holiday celebrations in a way that feels playful and delicious. Every time I make it, I think of Jen standing in her kitchen that Tuesday afternoon, making something extraordinary look like no big deal. That is the magic of this recipe—it makes you look like a rockstar host without the stress.
I encourage you to make this your own. Customize the seasonings, play with the decorations, and serve it at your next gathering. Watch people’s faces light up when they see it. Listen to the laughs and the compliments. That is what this recipe is really about—bringing people together around something fun and delicious.
Have you made this turkey-shaped cheese ball? I would love to hear how it turned out. Drop a comment below with your variations, your serving ideas, or just tell me about the looks on your guests’ faces. And if you loved it, share this recipe with a friend who loves to host. Let’s spread the cheese ball love!
Frequently Asked Questions
Can I make this cheese ball ahead of time?
Absolutely. You can prepare the cheese mixture, shape the body, and refrigerate it covered for up to two days. Just add the pretzel feathers and face decorations right before serving so the pretzels stay crunchy and the eyes stay secure.
How do I keep the pretzels from getting soggy?
Add the pretzels as close to serving time as possible. If you need to prepare ahead, store the cheese ball body in the fridge and insert the pretzels about an hour before guests arrive. The cold cheese helps keep the pretzels crisp.
Can I use low-fat cream cheese?
You can, but I don’t recommend it. Low-fat cream cheese has a higher water content, which can make the cheese ball softer and harder to shape. Full-fat cream cheese gives the best texture and flavor. If you must use low-fat, expect a slightly looser mixture and plan for a longer chilling time.
What if I don’t have candy eyes?
No problem. You can use two small black olives, two capers, or even two black peppercorns pressed gently into the cheese. For a fun alternative, use two small rounds of black licorice. Get creative with whatever you have on hand.
How many people does this cheese ball serve?
This recipe makes a generous cheese ball that serves about 12 to 16 people as part of an appetizer spread. If you are serving it as the main snack at a smaller gathering, expect it to feed 8 to 10 hungry guests. It goes fast, so you might want to make two!
Pin This Recipe!
Best Easy Crowd-Pleasing Turkey-Shaped Cheese Ball Recipe
A fun and festive turkey-shaped cheese ball made with cream cheese, sharp cheddar, and pretzel feathers. Perfect for fall gatherings and holiday parties, this easy appetizer is creamy, savory, and sure to steal the show.
- Prep Time: 20 minutes
- Cook Time: 0 minutes
- Total Time: 2 hours 20 minutes (includes chilling)
- Yield: 12 to 16 servings 1x
- Category: Appetizer
- Cuisine: American
Ingredients
- 16 ounces cream cheese, softened
- 2 cups sharp cheddar cheese, shredded
- 3 to 4 green onions, thinly sliced
- 1 teaspoon Worcestershire sauce
- 1/2 teaspoon garlic powder
- 1/2 teaspoon onion powder
- 1/4 teaspoon salt
- 1/4 teaspoon black pepper, freshly ground
- 20 to 24 pretzel sticks
- 2 candy eyes
- 1 small piece red bell pepper (for beak)
- Crackers or sliced baguette (for serving)
Instructions
- Soften the cream cheese: Remove cream cheese from refrigerator 30 to 45 minutes before starting. It should be soft enough to press a finger into easily. Alternatively, microwave in 10-second bursts until soft but not melted.
- Mix the base: In a large mixing bowl, combine softened cream cheese, shredded sharp cheddar, sliced green onions, Worcestershire sauce, garlic powder, onion powder, salt, and pepper. Beat with a hand mixer on medium speed until well combined and smooth. Scrape down sides of bowl halfway through. Taste and adjust seasoning if needed.
- Chill the mixture: Scoop cheese mixture onto a large piece of plastic wrap. Shape into a rough ball, wrap tightly, and refrigerate for at least 2 hours or up to overnight. For a quicker chill, freeze for 30 minutes.
- Shape the turkey body: Once firm, unwrap the cheese mixture and place on a serving platter. Using your hands, shape into a rounded oval or dome shape for the turkey’s body. If too soft, refrigerate for 10 minutes.
- Insert the pretzel feathers: Starting at the back of the cheese ball, gently push pretzel sticks into the cheese at a 45-degree angle, fanning them out like turkey tail feathers. Work in rows from back to front, using about 15 to 18 pretzels. Leave the front section empty for the face.
- Add the face: Press two candy eyes into the front of the cheese ball. Cut a small triangle from red bell pepper and press it in below the eyes for the beak. Optionally, add a small piece of red pepper under the beak for a wattle.
- Serve immediately or refrigerate: If serving right away, surround with crackers. If making ahead, cover loosely with plastic wrap (without disturbing pretzels) and refrigerate. Add pretzels just before serving for maximum crunch.
Notes
For best results, use full-fat cream cheese and shred your own cheddar. The cheese ball can be made up to 2 days ahead; add pretzels and face just before serving. If a pretzel breaks, eat the broken piece and use another. Let the cheese ball sit at room temperature for 15-20 minutes before serving for best flavor and spreadability.
Nutrition
- Serving Size: 1/12 of cheese ball
- Calories: 210
- Sugar: 2
- Sodium: 320
- Fat: 18
- Saturated Fat: 11
- Carbohydrates: 4
- Protein: 8
Keywords: turkey cheese ball, Thanksgiving appetizer, cheese ball recipe, easy appetizer, holiday appetizer, crowd-pleasing, pretzel feathers