I was standing in the middle of the grocery store parking lot last October, fumbling for my keys in a bag that had somehow become a black hole of receipts and old granola bar wrappers, when the wind shifted. It carried the unmistakable smell of cinnamon and brown sugar from the bakery inside the store, and just like that, I was nine years old again, sitting on a wobbly stool at my neighbor Mrs. Kowalski’s kitchen counter. She had flour dusted across her apron and a smear of butter on her cheek, and she was showing me how to crimp the edges of a pie crust so the filling wouldn’t bubble out. She taught me that day that the best pies aren’t the perfect ones—they’re the ones that look a little rough around the edges but taste like a hug. I can still feel the warmth of that tiny kitchen and the way the steam fogged up her glasses when she pulled the baking sheet from the oven. Maybe you’ve had that feeling too, that sudden, sharp memory of a specific person and a specific taste that you can’t quite recreate no matter how hard you try. Well, I’ve been trying with these salted caramel apple hand pies, and honestly, I think I finally got close. Close enough to share with you, anyway. These little pies are my attempt to capture that same cozy feeling—the one that hits you when the air turns crisp and the leaves start to fall, and all you want is something warm and sweet in your hands.
These hand pies aren’t just another fall dessert. They’re portable, they’re personal, and that salted caramel? It takes the whole thing over the top. I mean, who can resist that sweet-and-salty combo? Not me, that’s for sure. Let me tell you, I’ve made a mess of these more times than I can count—filling leaking out, crusts burning on the edges—but I kept at it because the good batches were just too good to give up on. And now, I think I’ve got a method that actually works. So grab your apples and your patience, and let’s make some fall magic together.
Why You’ll Love This Recipe
I have tested this recipe more times than I care to admit, and let me tell you, it was a journey. The first batch? A disaster. The filling was so runny it turned into apple soup inside the pastry. The second batch? Better, but the caramel burned before the apples were tender. But the third time? That was the charm. And now, after countless tweaks and a few tears shed over spilled caramel, I can confidently say this recipe is foolproof. Here is why you are going to love it:
- Quick & Easy: These hand pies come together in under an hour, making them perfect for a last-minute fall gathering or a cozy weekend baking project. No complicated techniques here.
- Simple Ingredients: You probably have most of these in your kitchen right now. Apples, butter, sugar, cinnamon, and store-bought pie crust to keep things easy. No fancy grocery trips required.
- Perfect for Fall: These little pies are made for crisp afternoons, apple picking adventures, and Thanksgiving leftovers. They’re the quintessential autumn treat.
- Crowd-Pleaser: I brought a batch to my book club last week, and they disappeared in minutes. Kids love them, adults love them, and everyone asks for the recipe.
- Unbelievably Delicious: The combination of tender, spiced apples, gooey salted caramel, and flaky, buttery crust is next-level comfort food. You will close your eyes after the first bite, I promise.
What makes this recipe different from all the other apple hand pie recipes out there? It is the caramel, honestly. I don’t just drizzle it on top at the end. I cook it into the apples so every single bite has that deep, buttery, salty-sweet flavor. It is not just another version of a hand pie—it is the best version. And it is the kind of recipe that makes you feel like you actually know what you are doing in the kitchen, even on a Tuesday night when you are tired and your counter is a mess.
What Ingredients You Will Need
This recipe uses simple, wholesome ingredients to deliver bold flavor and satisfying texture without the fuss. Most of these are pantry staples, especially if you do a bit of fall baking. Let me walk you through each one and share a few tips I have picked up along the way.
- 2 medium apples, peeled, cored, and diced small (I recommend Honeycrisp or Granny Smith for the best balance of sweetness and tartness. Honeycrisp holds its shape well, while Granny Smith gives a nice tang that cuts through the caramel.)
- 2 tablespoons unsalted butter (Use a good-quality butter here, like Kerrygold. It makes a real difference in the caramel.)
- 1/4 cup packed light brown sugar (Brown sugar adds that deep, molasses-y flavor that pairs so well with apples and caramel. Do not substitute with white sugar—you will lose that richness.)
- 1/2 teaspoon ground cinnamon (I prefer Saigon cinnamon for its bold, slightly spicy flavor, but any cinnamon will work.)
- 1/8 teaspoon ground nutmeg (Freshly grated nutmeg is a game-changer if you have it. It adds a warmth that pre-ground nutmeg just can’t match.)
- 1/8 teaspoon salt (To balance the sweetness and bring out the apple flavor.)
- 1/2 teaspoon vanilla extract (Pure vanilla extract, not imitation. Trust me on this.)
- 1 tablespoon water (Helps the apples soften and creates a bit of steam for the caramel.)
- 1 package (14.1 ounces) refrigerated pie crusts (I like Pillsbury refrigerated crusts for convenience, but feel free to use homemade if you have the time and energy. Just roll it out to about 1/8-inch thickness.)
- 1 large egg, beaten (For the egg wash. This gives the pies that beautiful golden-brown color.)
- 1 tablespoon turbinado sugar (Also called raw sugar. It adds a lovely crunch on top. You can substitute with coarse white sugar if needed.)
- For the salted caramel drizzle: You can use store-bought caramel sauce (like Ghirardelli or Trader Joe’s) and a pinch of flaky sea salt. Or, if you are feeling ambitious, make your own. I have included a quick stovetop version below.
- For the stovetop caramel (optional): 1/4 cup granulated sugar, 2 tablespoons unsalted butter, 2 tablespoons heavy cream, and a pinch of flaky sea salt.
One note on the apples: if you are using a very sweet variety like Fuji or Gala, you might want to reduce the brown sugar just a touch. But honestly, I have made it with Fuji apples before and it was still delicious—just a little sweeter. Also, if you are gluten-free, you can use a gluten-free pie crust. I have had good luck with the Wholly Gluten Free brand. Just follow the package directions for par-baking if needed.
Equipment Needed
You do not need a ton of fancy equipment to make these hand pies, which is part of why I love them. Here is what you will need:
- Large skillet (A non-stick or cast iron skillet works best for cooking the apples. I use my trusty 10-inch cast iron.)
- Wooden spoon or silicone spatula (For stirring the apples and caramel without scratching your pan.)
- Rolling pin (Even if you are using refrigerated crusts, a rolling pin helps even out the dough. If you don’t have one, a wine bottle works in a pinch.)
- 3-inch round cookie cutter (Or a glass with a 3-inch diameter. I have used a mason jar lid in a pinch.)
- Baking sheet (Line it with parchment paper for easy cleanup.)
- Pastry brush (For the egg wash. A silicone brush is easiest to clean.)
- Fork (For crimping the edges and poking vent holes.)
- Small saucepan (Only if you are making the stovetop caramel.)
Honestly, you could get away with just a skillet, a baking sheet, and a fork. But the cookie cutter makes the pies look so much prettier, and the pastry brush helps you get that even egg wash. I bought my set of cookie cutters at a thrift store for two dollars, so keep an eye out for bargains.
Preparation Method
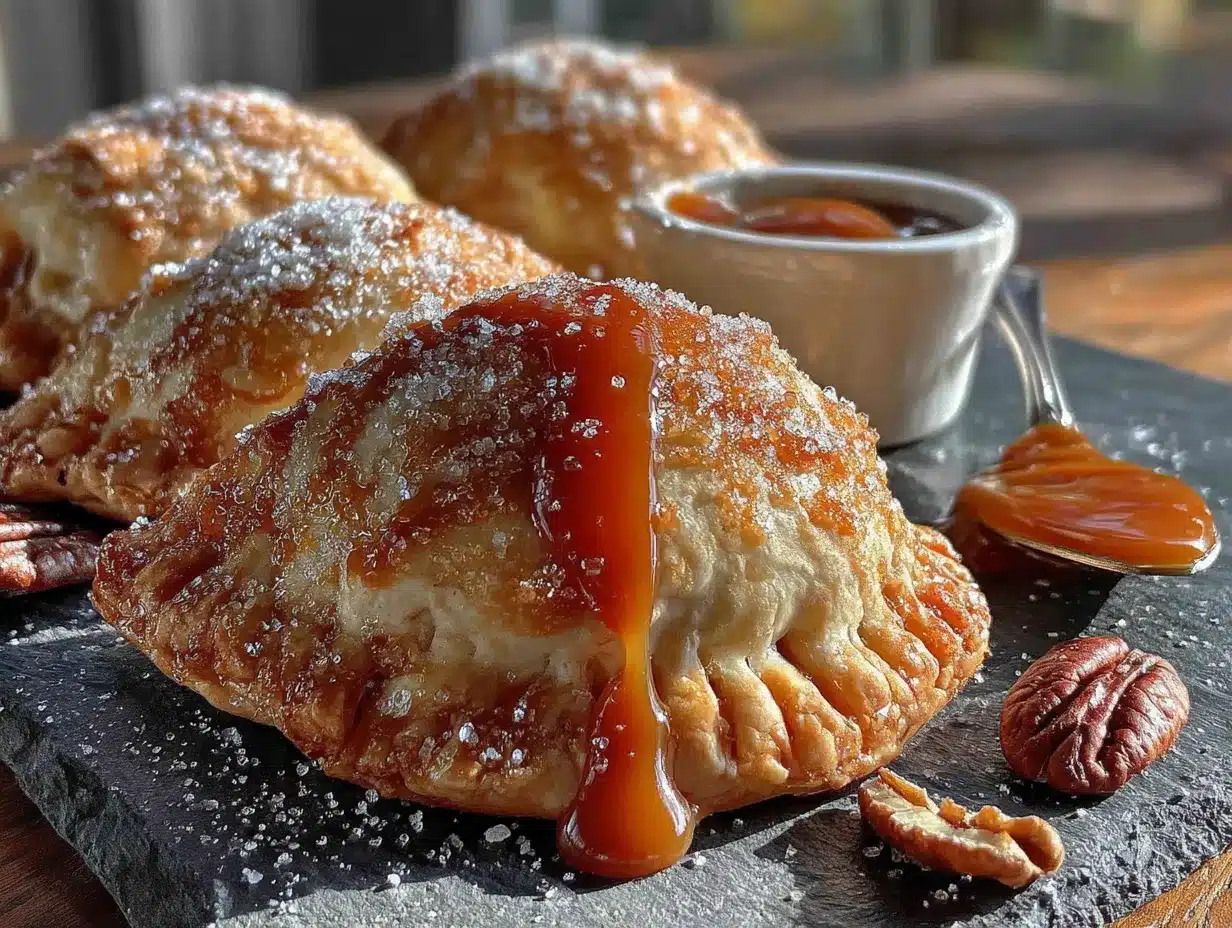
Alright, let’s get to the fun part. Here is how you make these little beauties, step by step. I have included all the little details I wish someone had told me the first time I tried this.
- Make the apple filling. In a large skillet over medium heat, melt the 2 tablespoons of unsalted butter. Once it is foaming (this should take about 30 seconds), add the diced apples. Cook for 3 to 4 minutes, stirring occasionally, until they start to soften and release some of their juice. You will notice the apples turning slightly translucent at the edges.
- Add the sugar and spices. Sprinkle the brown sugar, cinnamon, nutmeg, and salt over the apples. Stir to coat everything evenly. The sugar will start to melt and create a syrupy sauce. Cook for another 2 minutes, until the mixture is bubbling and fragrant.
- Finish the filling. Stir in the vanilla extract and the 1 tablespoon of water. The water helps thin the caramel just a bit and creates steam that finishes softening the apples. Cook for 1 more minute, then remove the skillet from the heat. Let the filling cool completely. This is crucial—if you put warm filling into the pie crust, it will make the dough soggy and hard to work with. I usually spread it out on a plate and pop it in the fridge for about 15 minutes.
- Preheat your oven. While the filling cools, preheat your oven to 400°F (200°C). Line a baking sheet with parchment paper.
- Prepare the pie crusts. Unroll the refrigerated pie crusts onto a lightly floured surface. If they seem sticky, dust a little more flour on top. Use your rolling pin to gently roll them out just a bit, smoothing out any creases from the packaging. You want the dough to be about 1/8-inch thick.
- Cut out the circles. Use your 3-inch round cookie cutter to cut out as many circles as you can from the first crust. You should get about 6 to 8 circles per crust. Gather the scraps, gently press them together, and re-roll to cut out more circles. Don’t overwork the dough, or it will get tough.
- Fill the pies. Place half of the dough circles on the prepared baking sheet, spacing them about 2 inches apart. Spoon about 1 tablespoon of the cooled apple filling onto the center of each circle. Be careful not to overfill—a little goes a long way, and too much filling will leak out during baking.
- Top and seal. Place the remaining dough circles on top of the filling. Use your fingers to press the edges together, then use a fork to crimp the edges and seal them completely. This also creates those classic ridges that make hand pies look so cute. Poke 2 or 3 small vent holes in the top of each pie with the fork to let steam escape.
- Apply the egg wash. Brush the top of each hand pie with the beaten egg. Be gentle so you don’t tear the dough. Sprinkle the turbinado sugar generously over the tops.
- Bake. Place the baking sheet in the preheated oven and bake for 18 to 22 minutes, or until the pies are golden brown and the filling is bubbling up through the vent holes. Keep an eye on them after 15 minutes—every oven runs a little differently.
- Cool and add caramel. Let the pies cool on the baking sheet for 5 minutes, then transfer them to a wire rack to cool completely. Once they are cool enough to handle (but still warm), drizzle with your salted caramel sauce and sprinkle with a pinch of flaky sea salt, if desired.
For the stovetop caramel (optional): While the pies are cooling, make the caramel. In a small saucepan over medium heat, melt 1/4 cup granulated sugar, stirring constantly with a silicone spatula. It will clump at first, then melt into a smooth, amber-colored liquid. This takes about 5 to 7 minutes. Remove from heat and immediately stir in 2 tablespoons of unsalted butter (be careful—it will bubble up). Stir until the butter is fully melted, then slowly pour in 2 tablespoons of heavy cream while stirring. Add a pinch of flaky sea salt. Let it cool for a few minutes before drizzling over the pies.
Cooking Tips & Techniques
I have made a lot of mistakes with these hand pies so you don’t have to. Here are the lessons I learned the hard way.
Don’t skip cooling the filling. I know it is tempting to just spoon it in while it is still warm, but warm filling will make the pie crust soggy before it even hits the oven. You will end up with a leaky, messy pie. Trust me on this—I learned after my third batch turned into apple soup.
Seal those edges well. Use a fork to crimp the edges, and press down firmly. If there is even a tiny gap, the filling will find it and escape during baking. I like to run my finger along the sealed edge after crimping, just to make sure there are no openings.
Don’t overfill. A heaping tablespoon is plenty for a 3-inch circle. If you add too much filling, the pies will burst open in the oven. You want a nice, tight seal so the filling stays inside and the pies puff up beautifully.
Use a hot oven. 400°F is the sweet spot for these hand pies. It is hot enough to crisp up the crust quickly without burning the caramel. If your oven runs hot, check the pies at 15 minutes and rotate the baking sheet halfway through.
Let them cool before adding the caramel drizzle. If you add the caramel while the pies are piping hot, it will just slide right off. Wait until they are just warm to the touch, then drizzle. The caramel will set slightly and stick to the crust.
One more thing—if you are making these ahead of time, bake them without the caramel drizzle, then add the caramel just before serving. The pies stay crisp longer that way.
Variations & Adaptations
One of the best things about this recipe is how easy it is to adapt. Here are a few ways I have changed it up over the years.
Dietary Variations: For a gluten-free version, use a gluten-free pie crust. I have had good results with the Wholly Gluten Free brand. Just make sure to roll it out between two sheets of parchment paper to prevent sticking. For a dairy-free version, substitute the butter in the filling with coconut oil and use a dairy-free pie crust. The caramel drizzle is a bit trickier to make dairy-free, but you can use a store-bought vegan caramel sauce or just skip it and dust the pies with powdered sugar instead.
Seasonal Twists: In the fall, you can swap half the apples for ripe pears for a different flavor profile. In the winter, try adding a tablespoon of cranberry sauce to the filling for a festive touch. In the spring, use fresh strawberries and rhubarb instead of apples. The technique stays the same—just adjust the sugar to taste.
Flavor Variations: Add a tablespoon of bourbon or dark rum to the apple filling for an adult twist. Or add a pinch of cardamom or ginger along with the cinnamon for a more complex spice blend. I once added a teaspoon of orange zest to the filling, and it was incredible—the citrus brightened up the whole pie.
Different Cooking Methods: You can also fry these hand pies! Heat about 2 inches of vegetable oil in a deep pot to 350°F and fry the pies for 2 to 3 minutes per side, until golden brown. Drain on paper towels and let cool before adding the caramel. They are extra crispy and indulgent this way.
Serving & Storage Suggestions
These hand pies are best served warm, drizzled with salted caramel and maybe a scoop of vanilla ice cream on the side. The contrast between the warm, flaky crust and the cold, creamy ice cream is absolutely heavenly. I also love them with a cup of hot apple cider or a cinnamon-spiced latte for the ultimate fall experience.
If you are serving them at a party, arrange them on a wooden board with the caramel sauce in a small bowl for dipping. They are perfect for Thanksgiving dessert tables, apple picking parties, or just a cozy night in with a good movie.
Storage Instructions: Store leftover hand pies in an airtight container at room temperature for up to 2 days. If you need to keep them longer, store them in the refrigerator for up to 5 days. The crust will soften a bit in the fridge, but they will still be delicious.
Reheating: To bring back that fresh-from-the-oven texture, reheat the pies in a 350°F oven for 5 to 7 minutes. You can also microwave them for 15 to 20 seconds, but the crust won’t be as crispy. If you reheated them, add the caramel drizzle after they are warm.
Freezing: You can freeze unbaked hand pies. Assemble them completely, place them on a baking sheet, and freeze until solid. Then transfer them to a freezer bag and store for up to 3 months. Bake from frozen, adding 5 to 7 minutes to the baking time. You can also freeze baked pies (without the caramel) and reheat them directly from frozen.
One thing I love about these pies is that the flavors actually get better after a day or two. The caramel soaks into the apples, and the spices meld together. So don’t worry if you have leftovers—they will still be amazing.
Nutritional Information & Benefits
Here is the approximate nutritional breakdown for one hand pie (without the optional caramel drizzle):
- Calories: 280
- Fat: 14g
- Carbohydrates: 36g
- Fiber: 2g
- Sugar: 18g
- Protein: 3g
These values will vary depending on the specific ingredients you use, especially the type of pie crust and the size of your apples. The caramel drizzle adds about 50 calories and 6g of sugar per tablespoon.
While these are definitely a treat, they do have some redeeming qualities. Apples are a good source of fiber and vitamin C, and cinnamon has anti-inflammatory properties. Plus, the portion-controlled size of hand pies makes it easier to enjoy a sweet treat without overindulging. I like to think of them as a little pocket of joy that fits perfectly into a balanced diet.
If you are watching your sugar intake, you can reduce the brown sugar in the filling to 3 tablespoons, or use a sugar substitute like monk fruit sweetener. The caramel drizzle is harder to lighten up, but you can skip it and just dust the pies with a little cinnamon and a pinch of salt.
Conclusion
These salted caramel apple hand pies are everything I love about fall baking. They are warm, cozy, and full of that sweet-and-salty magic that makes you want to curl up by the fire. The best part? They are actually simple to make, even on a busy weeknight when you are craving something homemade but don’t have hours to spend in the kitchen. I have made these for family gatherings, lazy Sunday afternoons, and even just for myself on a rainy Tuesday, and they never disappoint.
I encourage you to make this recipe your own. Maybe you add a little extra cinnamon, or swap the apples for pears, or skip the caramel and go for a dusting of powdered sugar instead. The beauty of hand pies is that they are forgiving and adaptable. So don’t be afraid to experiment and see what works for you.
I would love to hear how these turn out for you! Drop a comment below and let me know if you tried any variations, or share a photo of your hand pies on social media. Happy fall baking, friends!
Frequently Asked Questions
Can I use pre-made pie crust for these hand pies?
Absolutely! In fact, I recommend it for convenience. Refrigerated pie crusts work perfectly. Just make sure to roll them out slightly to even out the thickness and smooth any creases.
How do I prevent the hand pies from leaking in the oven?
The key is to seal the edges well. Use a fork to crimp them firmly, and make sure there are no gaps. Also, don’t overfill the pies—a heaping tablespoon of filling is plenty. Poking vent holes in the top also helps release steam and prevents the pies from bursting.
Can I make these hand pies ahead of time?
Yes! You can assemble the hand pies, place them on a baking sheet, and refrigerate them for up to 24 hours before baking. Alternatively, you can freeze them unbaked for up to 3 months. Bake from frozen, adding a few extra minutes to the cooking time.
What is the best apple to use for hand pies?
I recommend Honeycrisp or Granny Smith apples. Honeycrisp holds its shape well and has a good balance of sweetness and tartness. Granny Smith apples are firmer and more tart, which pairs beautifully with the sweet caramel. You can also use a mix of both for a more complex flavor.
Can I make the caramel sauce from scratch?
Definitely! I have included a simple stovetop caramel recipe in the instructions above. It only takes about 10 minutes and uses basic ingredients. If you are short on time, a good-quality store-bought caramel sauce works perfectly too. Just add a pinch of flaky sea salt to get that salted caramel flavor.
Pin This Recipe!

Best Easy Salted Caramel Apple Hand Pies for Fall Baking

These portable, personal hand pies feature tender spiced apples and gooey salted caramel in a flaky, buttery crust. They’re the perfect cozy fall treat, ready in under an hour.
- Prep Time: 25 minutes
- Cook Time: 20 minutes
- Total Time: 45 minutes
- Yield: 12 servings 1x
- Category: Dessert
- Cuisine: American
Ingredients
- 2 medium apples, peeled, cored, and diced small (Honeycrisp or Granny Smith recommended)
- 2 tablespoons unsalted butter
- 1/4 cup packed light brown sugar
- 1/2 teaspoon ground cinnamon
- 1/8 teaspoon ground nutmeg
- 1/8 teaspoon salt
- 1/2 teaspoon vanilla extract
- 1 tablespoon water
- 1 package (14.1 ounces) refrigerated pie crusts
- 1 large egg, beaten
- 1 tablespoon turbinado sugar
- For the salted caramel drizzle: store-bought caramel sauce and a pinch of flaky sea salt, or homemade stovetop caramel (1/4 cup granulated sugar, 2 tablespoons unsalted butter, 2 tablespoons heavy cre…
Instructions
- Make the apple filling: In a large skillet over medium heat, melt 2 tablespoons unsalted butter. Add diced apples and cook for 3-4 minutes until they start to soften.
- Add the sugar and spices: Sprinkle brown sugar, cinnamon, nutmeg, and salt over the apples. Stir to coat. Cook for 2 minutes until bubbling and fragrant.
- Finish the filling: Stir in vanilla extract and 1 tablespoon water. Cook for 1 more minute, then remove from heat. Let the filling cool completely (spread on a plate and refrigerate for about 15 minutes).
- Preheat oven to 400°F (200°C). Line a baking sheet with parchment paper.
- Prepare the pie crusts: Unroll refrigerated pie crusts onto a lightly floured surface. Roll out gently to about 1/8-inch thickness.
- Cut out circles: Use a 3-inch round cookie cutter to cut circles from the crust. Gather scraps, press together, and re-roll to cut more circles.
- Fill the pies: Place half the dough circles on the prepared baking sheet, spacing 2 inches apart. Spoon about 1 tablespoon of cooled apple filling onto the center of each.
- Top and seal: Place remaining dough circles on top. Press edges together with fingers, then crimp with a fork to seal. Poke 2-3 vent holes in the top of each pie.
- Apply egg wash: Brush tops with beaten egg. Sprinkle generously with turbinado sugar.
- Bake for 18-22 minutes until golden brown and filling bubbles through vent holes. Check after 15 minutes.
- Cool and add caramel: Let pies cool on baking sheet for 5 minutes, then transfer to a wire rack. Once warm (not hot), drizzle with salted caramel sauce and sprinkle with flaky sea salt if desired.
- For stovetop caramel (optional): In a small saucepan over medium heat, melt 1/4 cup granulated sugar, stirring constantly, until amber (5-7 minutes). Remove from heat, stir in 2 tablespoons unsalted butter (careful—it will bubble), then slowly pour in 2 tablespoons heavy cream while stirring. Add a pinch of flaky sea salt. Cool slightly before drizzling.
Notes
Don’t skip cooling the filling—warm filling makes the crust soggy. Seal edges well to prevent leaking. Don’t overfill; a heaping tablespoon is plenty. Use a hot oven (400°F) for a crisp crust. Let pies cool before adding caramel drizzle so it sticks. For make-ahead, bake without caramel and add just before serving.
Nutrition
- Serving Size: 1 hand pie
- Calories: 280
- Sugar: 18
- Fat: 14
- Carbohydrates: 36
- Fiber: 2
- Protein: 3
Keywords: apple hand pies, salted caramel, fall baking, hand pies, apple dessert, easy hand pies