The church potluck was in six hours and I’d completely forgotten. I mean, completely. I was standing in my kitchen at 2 PM on a Saturday, staring at a pack of chicken thighs I’d defrosted for no particular reason, while mentally calculating how long it would take to drive to the store and buy something impressive. Everyone else would be bringing their signature dishes—Mary’s famous baked ziti, Linda’s three-layer chocolate cake, and old Mrs. Patterson’s legendary corn casserole that people literally line up for. I had chicken thighs, a hunk of Parmesan that was starting to look sad, and about twenty minutes of actual cooking time before I needed to start getting ready.
Honestly, I almost gave up and grabbed a rotisserie chicken from the grocery store. But something made me stop. I had this air fryer sitting on my counter, looking all shiny and unused since I’d bought it on a whim three months ago. “Let’s see what you’ve got,” I muttered to it, like a crazy person talking to kitchen appliances. I seasoned those thighs with whatever I could grab—garlic powder, the last of my dried oregano, salt, pepper—and tossed them in the air fryer basket. I didn’t even bother with a proper breading. I just sprinkled some grated Parmesan on top and hoped for the best.
Fast forward to the potluck, where my sad little chicken thighs sat on a paper plate next to everyone’s elaborate dishes. I watched people fill their plates with the usual suspects, and I figured my chicken would go home with me, uneaten and unloved. But then Mr. Henderson, who never eats anything at potlucks, took one. Then another. Then he came back to the table and pointed at my plate and said, “Who made this chicken?” Suddenly, there was a line. The plate was empty in ten minutes. People were asking for the recipe, and I had to scribble it down on a napkin because I hadn’t even thought to write it down. That’s the thing about this crispy air fryer chicken thighs recipe—it’s the underdog that wins every time. Maybe you’ve been there, staring at your pantry and wondering how you’re going to pull off dinner. Let me tell you, this recipe might just save your weeknight, too.
Why You’ll Love This Recipe
I’ve tested this recipe more times than I can count, and I’ve learned a few things along the way. Let me break it down for you, because honestly, this isn’t just another chicken recipe. This is the one you’ll come back to again and again.
- Quick & Easy: From fridge to table in under 30 minutes. No marinating overnight, no complicated steps, no stress. Perfect for those evenings when you walk through the door and someone is already asking “What’s for dinner?”
- Simple Ingredients: You probably have everything in your kitchen right now. Chicken thighs, garlic powder, Parmesan cheese, salt, pepper, and a little oil. That’s it. No fancy grocery trips required.
- Perfect for Family Meals: This is the kind of recipe that pleases everyone—from picky toddlers to teenagers who eat everything in sight to grandparents who appreciate good food. It’s become our go-to Sunday dinner, and it works just as well for a busy Tuesday.
- Crowd-Pleaser: I’ve brought these to potlucks, family gatherings, and even a Super Bowl party. They disappear every single time. People always ask for the recipe, and they’re always surprised when I tell them it took ten minutes of prep.
- Unbelievably Delicious: The skin gets perfectly crispy in the air fryer, while the meat stays juicy and tender. The garlic and Parmesan create this savory crust that’s honestly addictive. I’ve caught myself standing at the counter eating them straight from the basket.
What makes this recipe different from every other air fryer chicken recipe out there? It’s the technique. I’ve learned that patting the chicken thighs dry (really dry) and using just the right amount of oil makes all the difference. Plus, I add the Parmesan at the perfect moment so it gets golden and crispy without burning. This isn’t just another version of air fryer chicken—it’s the best version I’ve found after countless trials. And trust me, I’ve had some failures along the way.
This recipe connects to something deeper, too. It’s the kind of meal that makes you close your eyes after the first bite. It’s comfort food reimagined—healthier, faster, but with the same soul-soothing satisfaction. Perfect for impressing guests without stress, or turning a simple weeknight into something memorable.
What Ingredients You Will Need
This recipe uses simple, wholesome ingredients to deliver bold flavor and satisfying texture without the fuss. Most of these are pantry staples, which is exactly what you want when you’re feeding a family on a budget.
- Chicken Thighs (bone-in, skin-on): 4-6 thighs (about 2 pounds or 900g). Bone-in, skin-on thighs are the star here—they stay juicy and the skin gets incredibly crispy. I’ve tried boneless, and they work, but you lose that amazing texture. Look for thighs that are roughly the same size so they cook evenly.
- Garlic Powder: 1 teaspoon. Not garlic salt—garlic powder. It distributes evenly and doesn’t burn as easily as fresh garlic. I’ve made the mistake of using fresh minced garlic, and it just burns in the air fryer. Stick with powder for the best results.
- Onion Powder: 1/2 teaspoon. Adds a subtle sweetness that rounds out the savory flavors. You could skip it, but honestly, it makes a difference.
- Dried Oregano: 1/2 teaspoon. I prefer Mediterranean oregano for its slightly floral notes, but any dried oregano works. Italian seasoning is a fine substitute if that’s what you have.
- Dried Thyme: 1/2 teaspoon. Adds earthiness that pairs beautifully with the garlic and Parmesan. Fresh thyme works too—just use 1 teaspoon and strip the leaves off the stems.
- Salt: 1 teaspoon. I use kosher salt because it’s easier to distribute evenly. If you’re using table salt, reduce to 3/4 teaspoon.
- Black Pepper: 1/2 teaspoon, freshly ground if possible. It makes a difference, I promise.
- Grated Parmesan Cheese: 1/3 cup (about 30g). Use the good stuff from a block, not the green can. The pre-grated stuff has anti-caking agents that prevent it from melting properly. I recommend a block of Parmigiano-Reggiano if your budget allows—it’s worth the splurge.
- Olive Oil: 1 tablespoon. Just enough to help the seasoning stick and encourage browning. Avocado oil works too, and it has a higher smoke point.
- Optional Garnish: Fresh parsley, chopped (about 2 tablespoons). Adds a pop of color and freshness. Completely optional, but nice if you’re serving company.
For the garlic lovers out there, you can add an extra 1/2 teaspoon of garlic powder. I’ve done it, and it’s fantastic. Just don’t go overboard, or it can become bitter during cooking.
Equipment Needed
You don’t need much for this recipe, which is part of the beauty. Here’s what you’ll need:
- Air Fryer: Any size works, but a 5.8-quart or larger basket-style air fryer is ideal for fitting 4-6 thighs without overcrowding. I use a Cosori 5.8-quart, and it’s been a workhorse. If your air fryer is smaller, cook in batches—overcrowding leads to soggy skin.
- Tongs: For flipping the chicken halfway through. Silicone-tipped tongs won’t scratch your air fryer basket.
- Paper Towels: Essential for patting the chicken dry. This step is non-negotiable for crispy skin.
- Small Bowl: For mixing the seasoning blend.
- Cutting Board: For resting the chicken after cooking. A wooden or plastic board works fine.
- Instant-Read Thermometer (optional but recommended): Takes the guesswork out of doneness. Chicken thighs should reach 175°F (80°C) for the best texture.
If you don’t have an air fryer, you can adapt this recipe for a conventional oven. Bake at 425°F (220°C) on a wire rack set over a baking sheet for 35-40 minutes, flipping halfway. The skin won’t be quite as crispy, but it’s still delicious.
Preparation Method
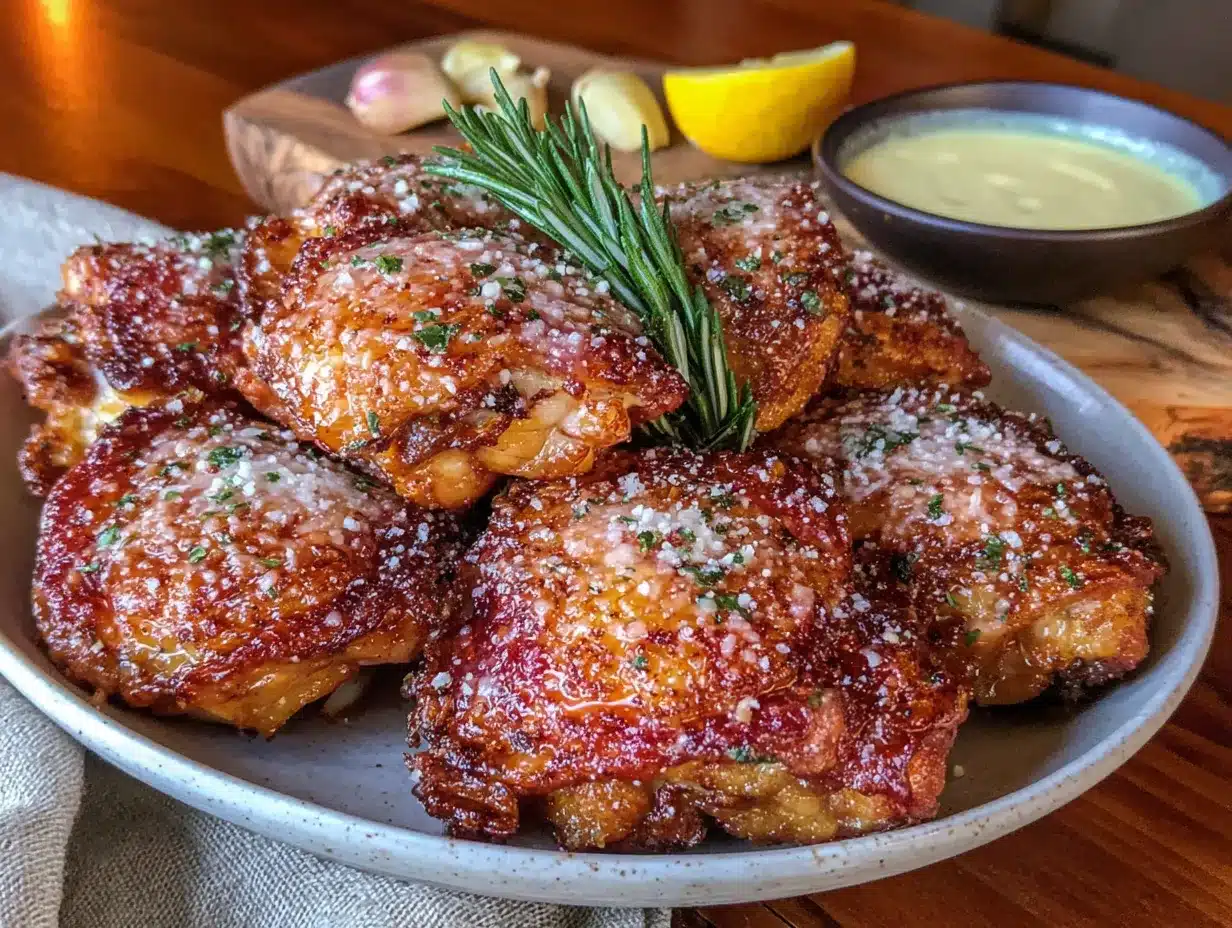
Let’s get cooking. I’ve broken this down step by step so you can follow along easily.
- Prep the Chicken: Start by patting the chicken thighs dry with paper towels. I mean really dry—get in between the skin and the meat if you can. This is the most important step for crispy skin. Any moisture will steam the skin instead of crisping it. Let the thighs sit on a plate for 5 minutes to air-dry a bit more.
- Mix the Seasoning: In a small bowl, combine 1 teaspoon garlic powder, 1/2 teaspoon onion powder, 1/2 teaspoon dried oregano, 1/2 teaspoon dried thyme, 1 teaspoon salt, and 1/2 teaspoon black pepper. Stir to combine. Smell it—it should be aromatic and savory.
- Season the Chicken: Drizzle the 1 tablespoon of olive oil over the chicken thighs and rub it in with your hands. Then sprinkle the seasoning mixture evenly over all sides of the chicken. Don’t forget the underside—it needs flavor too. Pat the seasoning gently so it adheres.
- Preheat the Air Fryer: Set your air fryer to 380°F (195°C) and let it preheat for 3-5 minutes. Preheating ensures even cooking and better browning. I’ve skipped this step before, and the chicken came out less crispy. Learn from my mistakes.
- Arrange the Chicken: Place the seasoned chicken thighs in the air fryer basket, skin-side down. Leave a little space between each thigh for air to circulate. If they’re touching, they won’t crisp properly. Depending on your air fryer size, you may need to cook in batches.
- First Cook: Cook at 380°F (195°C) for 12 minutes. Don’t open the basket during this time—you’ll let out all the hot air. The skin should be starting to turn golden.
- Flip and Add Parmesan: Using tongs, carefully flip the chicken thighs so they’re skin-side up. Sprinkle the 1/3 cup of grated Parmesan cheese evenly over the skin of each thigh. Don’t pile it on—a light, even layer is what you want.
- Second Cook: Cook for another 8-10 minutes at 380°F (195°C). The cheese should be melted and golden brown, and the internal temperature of the thickest part of the thigh should reach 175°F (80°C). If you don’t have a thermometer, look for juices running clear and the skin being deeply golden and crispy.
- Rest: Remove the chicken from the air fryer and let it rest on a cutting board for 5 minutes. This allows the juices to redistribute, keeping the meat tender and moist. If you cut into it immediately, all those juices will run out onto the board.
- Garnish and Serve: Sprinkle with fresh chopped parsley if you’re using it, and serve immediately. The skin will start to lose its crispiness as it sits, so enjoy these while they’re hot.
A quick note: cooking times can vary based on your air fryer model and the size of your chicken thighs. Thicker thighs may need an extra 2-3 minutes. Always go by internal temperature for the most reliable results.
Cooking Tips & Techniques
After making this recipe more times than I can count, I’ve collected a few lessons worth sharing. Some came from successes, others from spectacular failures.
Don’t skip the drying step. I learned this the hard way when I made soggy-skinned chicken for my in-laws. Water is the enemy of crispiness. Take the extra minute to really pat those thighs dry. If you have time, let them sit uncovered in the fridge for an hour—this dries the skin even further.
Watch the cheese. Parmesan can go from golden to burnt in about 30 seconds. Start checking at the 8-minute mark during the second cook. Every air fryer runs a little differently, so trust your eyes more than the timer. If the cheese is browning too fast, reduce the temperature to 360°F (180°C) for the remaining time.
Batch cooking is your friend. If you’re feeding a crowd, cook the chicken in batches and keep the finished pieces warm in a 200°F (95°C) oven on a wire rack. Don’t stack them—they’ll steam and lose crispiness. I’ve made the mistake of piling them on a plate, and it was a sad, soggy situation.
Timing strategy: While the air fryer is preheating, prep any sides you’re serving. This chicken goes great with a simple salad, roasted vegetables, or rice. I like to start a batch of roasted broccoli at the same time—it finishes around the same time as the chicken.
One more thing: Don’t overcrowd the basket. I know it’s tempting to cram in as many thighs as possible, especially when you’re hungry. But overcrowding traps steam and prevents that beautiful crispy skin from forming. It’s better to cook in two batches than to end up with mediocre chicken.
Variations & Adaptations
This recipe is wonderfully adaptable. Here are some variations I’ve tried and loved:
Spicy Version: Add 1/2 teaspoon of cayenne pepper or red pepper flakes to the seasoning mix. The heat pairs beautifully with the garlic and Parmesan. My husband loves this version, and it’s become his go-to request.
Lemon Herb: Add the zest of one lemon to the seasoning mix, and squeeze fresh lemon juice over the finished chicken. It brightens up the flavors and makes it feel lighter—perfect for spring and summer meals.
Gluten-Free Adaptation: This recipe is naturally gluten-free as written, which is great for anyone with sensitivities. Just double-check that your Parmesan doesn’t contain anti-caking agents with gluten.
Dairy-Free Option: Skip the Parmesan and add an extra 1/2 teaspoon of nutritional yeast for a cheesy flavor without the dairy. It won’t get quite as crispy, but it’s still delicious. I’ve made this for my dairy-intolerant sister, and she loved it.
Different Cuts: This seasoning works beautifully on chicken drumsticks or chicken wings. Adjust cooking time accordingly—drumsticks may need 20-25 minutes total, and wings need about 15-18 minutes. Just make sure the internal temperature reaches 175°F (80°C).
Baked Version: If you don’t have an air fryer, bake at 425°F (220°C) on a wire rack set over a baking sheet for 35-40 minutes. Flip halfway through and add the Parmesan in the last 10 minutes. The texture won’t be quite as crispy, but the flavor is still fantastic.
Serving & Storage Suggestions
These crispy air fryer chicken thighs are best served hot, right out of the air fryer. The skin is at its peak crispiness within the first 10 minutes. I like to arrange them on a platter with a sprinkle of fresh parsley and lemon wedges on the side.
What to serve with them: This chicken pairs beautifully with almost any side. I often serve it with roasted vegetables—broccoli, asparagus, or Brussels sprouts work particularly well. A simple green salad with a tangy vinaigrette cuts through the richness. For heartier meals, try mashed potatoes, rice pilaf, or crusty bread to soak up any juices.
Storage: Leftover chicken can be stored in an airtight container in the refrigerator for up to 4 days. The skin will soften during storage, but don’t worry—you can crisp it back up.
Reheating: The air fryer is your best friend here. Reheat at 350°F (175°C) for 3-4 minutes until the skin crisps up again. The microwave will make the skin soggy, so avoid it if possible. I’ve also had good results reheating in a 375°F (190°C) oven for 8-10 minutes.
Freezing: Cooked chicken thighs freeze well for up to 3 months. Let them cool completely, then wrap individually in plastic wrap and place in a freezer bag. Thaw overnight in the refrigerator and reheat in the air fryer as directed above. The texture won’t be quite as good as fresh, but it’s still a solid option for busy nights.
One thing I’ve noticed: the flavors actually deepen after a day in the fridge. The garlic and Parmesan meld together beautifully, making leftovers almost as good as the original meal.
Nutritional Information & Benefits
Here’s the approximate nutritional breakdown for one serving (one chicken thigh with skin):
- Calories: 280-320
- Protein: 25-28g
- Fat: 18-22g
- Saturated Fat: 5-7g
- Carbohydrates: 2-3g
- Fiber: 0g
- Sugar: 0g
- Sodium: 500-600mg
Chicken thighs are an excellent source of protein, iron, and B vitamins, particularly niacin and vitamin B6. The skin does add fat, but it also provides much of the flavor and crispiness. If you’re watching your fat intake, you can remove the skin after cooking—though you’ll lose some of the texture.
The Parmesan cheese adds calcium and a boost of umami flavor without a significant calorie load. This recipe is naturally low-carb and keto-friendly, making it a great option for those following a low-carb lifestyle. It’s also gluten-free as written.
One note: if you’re watching your sodium intake, you can reduce the salt to 1/2 teaspoon. The Parmesan adds saltiness on its own, so you won’t miss it as much as you might think.
Conclusion
This recipe has become a staple in my kitchen for good reason. It’s simple enough for a busy weeknight but impressive enough for company. The combination of crispy skin, juicy meat, and savory garlic Parmesan flavor is hard to beat. Plus, it uses affordable ingredients that you probably already have on hand.
I encourage you to make this recipe your own. Add more garlic if that’s your thing. Throw in some red pepper flakes for heat. Serve it with your family’s favorite sides. The beauty of this recipe is how adaptable it is while still delivering consistent, delicious results.
Honestly, this is one of those recipes that makes me feel like a hero in the kitchen with minimal effort. The first time I made it, I couldn’t believe something so simple could taste so good. Now it’s the recipe I turn to when I need a guaranteed win.
I’d love to hear how yours turns out! Drop a comment below and let me know if you tried any variations—or if this became a new family favorite like it did for mine. Don’t forget to share this recipe with a friend who needs an easy dinner win. Happy cooking!
Frequently Asked Questions
Can I use boneless, skinless chicken thighs?
Yes, but the texture will be different. Boneless, skinless thighs cook faster (about 15-18 minutes total) and won’t get as crispy. Reduce the cooking time and check for doneness at 165°F (74°C). The flavor will still be great, but you’ll miss that crispy skin.
Why is my chicken not getting crispy?
Most likely, the chicken wasn’t dried thoroughly before seasoning. Moisture is the enemy of crispiness. Also, check that you’re not overcrowding the air fryer basket—air needs to circulate around each piece. Finally, make sure your air fryer is fully preheated before adding the chicken.
Can I make this recipe ahead of time?
You can season the chicken up to 24 hours in advance and store it in the refrigerator. This actually improves the flavor. However, cook the chicken just before serving for the best texture. Leftovers can be reheated in the air fryer to restore some crispiness.
What if I don’t have an air fryer?
You can bake the chicken in a conventional oven at 425°F (220°C) on a wire rack set over a baking sheet. Bake for 35-40 minutes, flipping halfway through. Add the Parmesan in the last 10 minutes of baking. The skin won’t be quite as crispy, but the flavor will still be delicious.
How do I know when the chicken is fully cooked?
The safest way is to use an instant-read thermometer. Chicken thighs should reach an internal temperature of 175°F (80°C) for the best texture. If you don’t have a thermometer, look for clear juices running from the chicken and the meat pulling away from the bone slightly. The skin should be golden brown and crispy.
Pin This Recipe!

Crispy Air Fryer Chicken Thighs: Easy Garlic Parmesan Recipe

Crispy, juicy air fryer chicken thighs with a savory garlic Parmesan crust. Ready in under 30 minutes with simple ingredients, this easy recipe is perfect for busy weeknights and guaranteed to please a crowd.
- Prep Time: 10 minutes
- Cook Time: 20 minutes
- Total Time: 30 minutes
- Yield: 4 servings 1x
- Category: Main Course
- Cuisine: American
Ingredients
- 4–6 bone-in, skin-on chicken thighs (about 2 pounds or 900g)
- 1 teaspoon garlic powder
- 1/2 teaspoon onion powder
- 1/2 teaspoon dried oregano
- 1/2 teaspoon dried thyme
- 1 teaspoon kosher salt (or 3/4 teaspoon table salt)
- 1/2 teaspoon black pepper, freshly ground
- 1/3 cup grated Parmesan cheese (about 30g, preferably from a block)
- 1 tablespoon olive oil
- 2 tablespoons fresh parsley, chopped (optional garnish)
Instructions
- Pat the chicken thighs dry with paper towels, getting in between the skin and meat if possible. Let them sit on a plate for 5 minutes to air-dry.
- In a small bowl, combine garlic powder, onion powder, dried oregano, dried thyme, salt, and black pepper. Stir to combine.
- Drizzle olive oil over the chicken thighs and rub it in with your hands. Sprinkle the seasoning mixture evenly over all sides of the chicken, patting gently to adhere.
- Preheat the air fryer to 380°F (195°C) for 3-5 minutes.
- Place the seasoned chicken thighs in the air fryer basket, skin-side down, leaving space between each piece for air circulation.
- Cook at 380°F (195°C) for 12 minutes without opening the basket.
- Using tongs, carefully flip the chicken thighs so they are skin-side up. Sprinkle the grated Parmesan cheese evenly over the skin of each thigh.
- Cook for another 8-10 minutes at 380°F (195°C), until the cheese is melted and golden brown and the internal temperature of the thickest part reaches 175°F (80°C).
- Remove the chicken from the air fryer and let it rest on a cutting board for 5 minutes.
- Sprinkle with fresh chopped parsley if desired and serve immediately.
Notes
Pat the chicken very dry for maximum crispiness. Watch the Parmesan closely during the second cook as it can burn quickly. If your air fryer is smaller, cook in batches to avoid overcrowding. For a conventional oven, bake at 425°F (220°C) on a wire rack over a baking sheet for 35-40 minutes, flipping halfway and adding Parmesan in the last 10 minutes.
Nutrition
- Serving Size: 1 chicken thigh
- Calories: 300
- Sodium: 550
- Fat: 20
- Saturated Fat: 6
- Carbohydrates: 2
- Protein: 26
Keywords: air fryer chicken thighs, crispy chicken thighs, garlic parmesan chicken, easy chicken recipe, weeknight dinner, keto chicken, gluten-free chicken