The Best Gluten-Free Pumpkin Pie Bars for Fall
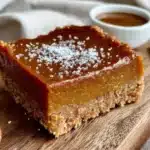
These gluten-free pumpkin pie bars feature a press-in shortbread crust and a silky, spiced pumpkin filling. They’re the perfect make-ahead dessert for fall gatherings, offering all the flavor of pumpkin pie without the stress of a finicky crust.
- Prep Time: 20 minutes
- Cook Time: 40 minutes
- Total Time: 5 hours (includes cooling and chilling time)
- Yield: 16 bars 1x
- Category: Dessert
- Cuisine: American
Ingredients
Scale
- 1 ½ cups (180g) gluten-free shortbread cookie crumbs (about 8 oz of cookies, like Simple Mills or Kinnikinnick)
- 5 tablespoons (70g) unsalted butter, melted
- 2 tablespoons (25g) granulated sugar
- ¼ teaspoon fine sea salt
- 1 can (15 oz or 425g) pure pumpkin purée
- 1 can (14 oz or 396g) sweetened condensed milk
- 2 large eggs, at room temperature
- 1 teaspoon vanilla extract
- 1 ½ teaspoons ground cinnamon
- ½ teaspoon ground ginger
- ½ teaspoon ground nutmeg
- ¼ teaspoon ground cloves
- ¼ teaspoon fine sea salt
- 1 ½ cups (360ml) heavy whipping cream, cold (for topping)
- 2 tablespoons powdered sugar (for topping)
- ½ teaspoon vanilla extract (for topping)
- Ground cinnamon or nutmeg, for dusting (for topping)
Instructions
- Preheat your oven to 350°F (175°C). Line a 9×13-inch baking pan with parchment paper, leaving about 2 inches overhanging on the two long sides. Lightly spray the parchment with non-stick spray.
- Make the crust: Place the gluten-free shortbread cookies in a food processor and pulse until you have fine, even crumbs (about 1 ½ cups). Pour the crumbs into a medium bowl. Add the melted butter, sugar, and salt. Stir with a fork until the mixture looks like wet sand and holds together when squeezed.
- Press the crust: Dump the crumb mixture into the prepared pan. Use the bottom of a flat measuring cup or a glass to press it down firmly and evenly, making sure to press it into the corners. Bake the crust for 10 minutes, until fragrant and just starting to turn light golden brown at the edges. Set on a cooling rack.
- Whisk the filling: In a large bowl, whisk together the pumpkin purée and sweetened condensed milk until completely smooth. Add the eggs, one at a time, whisking well after each addition. Then whisk in the vanilla, cinnamon, ginger, nutmeg, cloves, and salt until fully incorporated and the mixture is a uniform orange color. Do not over-whisk.
- Pour and bake: Pour the pumpkin filling over the warm crust. Gently tilt the pan or use a spatula to spread it into an even layer. Tap the pan on the counter a few times to release air bubbles. Bake for 35-40 minutes. The edges should be set and the center should still have a slight jiggle. A knife inserted an inch from the center should come out mostly clean.
- Cool completely: Place the pan on a wire rack and let it cool to room temperature, about 1 ½ to 2 hours. Then, cover the pan with plastic wrap or foil and refrigerate for at least 4 hours, or overnight.
- Slice and serve: Once fully chilled, use the parchment handles to lift the entire block of bars out of the pan. Place on a cutting board. Use a long, sharp knife to slice into 16 squares, wiping the knife clean between each slice. Serve cold or at room temperature with a dollop of whipped cream and a dusting of cinnamon.
Notes
Don’t overbake—the center should still jiggle slightly when you pull it out of the oven. Chilling for at least 4 hours (or overnight) is essential for clean slices. For a dairy-free version, use plant-based butter and coconut sweetened condensed milk. The bars can be made up to 2 days in advance and freeze well for up to 3 months.
Nutrition
- Serving Size: 1 bar (without whipp
- Calories: 285
- Sugar: 24
- Sodium: 210
- Fat: 14
- Saturated Fat: 8
- Carbohydrates: 36
- Fiber: 2
- Protein: 5
Keywords: gluten-free pumpkin bars, pumpkin pie bars, gluten-free dessert, fall dessert, pumpkin dessert, easy pumpkin bars, gluten-free pumpkin pie